
Going around your files and directories using the shell can feel slow and confusing, and not only when you’re a beginner. Personally, I was using GUIs (Graphical User Interfaces) to display, rename, move, and delete my files for a long time. It took me a couple of years to really get used to the shell to perform these operations. Today, I only use the shell to manage my files, and I think it is the better way.
It doesn’t mean that GUIs are useless, but, even if they could feel optimal for files and directories management, they’re not as effective as the CLIs (Command-Line Interfaces) and TUIs (Terminal User Interfaces). If you follow this blog for long enough, you know that I love Mouseless environments centered around the shell, and for good reasons.
This article exists because of an email I received from a reader, wondering if there were some tips and tools to make the file management experience in the shell more effective and user-friendly. The short answer: there are such tools, and that’s exactly what we’ll explore in this article. More precisely, we’ll look at:
- The basic CLIs to manage files and directories, as well as some tips to manage them more easily.
- Other minimal tools complementing the basic ones we’ve seen previously.
- We’ll look at some interesting TUIs to make your filesystem more visual, similar to GUIs, but inside the shell.
- We’ll finally look at different ways to bookmark your favorite directories to access them as quickly as possible.
We’ll only look to the tools aiming to help you manage your filesystem, nothing for reading or writing your files directly. Also, this article is only about tools available for Unix or Linux-based system.
Last warning: this article expects you to know some basics about the Unix/Linux shell. If you don’t, I encourage you to read my book ‘cause it’s the best book on Earth (obviously), even better than The Little Prince. I swear. With that, you’ll learn a lot about Linux, its shell, and bad humor.
Are you ready to improve your experience of managing your precious files and directories? Let’s go, then!
The Basics of File Management in the Shell
Let’s first look quickly at the tools you’re likely to already have on your system. I’ll always reference the GNU tools here, so if you run macOS, I definitely recommend you to use them, instead of the inferior BSD alternatives.
Common Tools
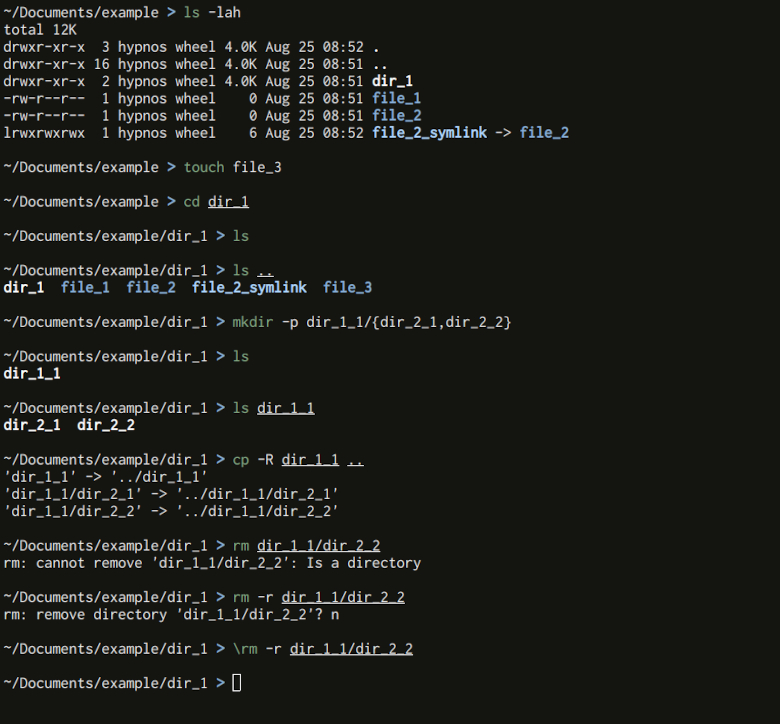
If you have any experience with a shell, I’m pretty sure you know already these tools. To me, they are the basic ones you can use to manage your filesystem. Like many, I use them every day.
If you wonder what the “working directory” is, it’s the current directory you’re in.
| Command | Description | Interesting options |
|---|---|---|
cd | Move to a different directory (change your working directory). | _ |
pwd | Print your working directory. | _ |
ls | List the files and directories of your working directory. | -l (long listing format) | -h (human-readable) | -a (display hidden files) |
cp | Copy files. | -r (recursive - to copy directories) | -i (interactive - prompt before overwriting) |
mv | Move files and directories. | -i (interactive - prompt before overwriting) |
touch | Create a file if it doesn’t exist, only “touch” it if it does (change its access time stamp). | _ |
mkdir | Create directory(ies). | -p (parents - also create parents, no error thrown if the directory you try to create already exists) |
rm | Delete files. | -r (recursive - to delete directories) | -i (interactive - prompt before removing) |
rmdir | Remove empty directories. | _ |
Documentation
If you don’t know these commands, or if you don’t know how to use them, you can look at their official (and less official) documentation.
- For most of these tools, you can use the options
--helpor-hdirectly in your shell, likemkdir --helpfor example, to get a quick idea how to use them. - For (way) more information, you can look at their respective man page ; for example, run
man cdorman mvin your shell. - You can install something like tldr to get some useful examples. It’s more beginner-friendly than the good (but crowded) man pages.
You can also search how to use these tools on The Great Internet™ directly (you know, by using Bing). But you have big chances to get swamped in basic (and somewhat useless) information. Good documentation always top stack overflow.
Best Practices
Here’s a couple of best practices to name your files and directories. They will help you greatly to manage your file and directory names on Unix and Linux-based filesystems:
- Avoid spaces at all costs. It’s allowed, but you’ll need to escape them each time you want to use the paths of your files. If you want a space in your file (or directory) name, use an underscore (
_) instead. - Avoid uppercase. The reason: macOS filesystem will ignore them, but Linux won’t. If a couple of people use both OS and work on the same files, it will create problems. Been there, done that.
- You can use underscore and hyphens, but avoid other special characters.
This has nothing official, but believe me, it will make your file and directory management easier.
The Shell Chainsaw
One of the major problem novices and experts alike will painfully stumble upon when managing files and directories using the shell: the CLIs we saw above are powerful tools; maybe a bit too much. If you run rm on multiple file (for example rm file1 file2 file3) all your files will be removed forever, without any prompt or warning.
Tools like cp and mv can be dangerous too: they will overwrite files with the same names without any warning. But fear not! These three tools have a useful option to avoid using a chainsaw (and cut your arm) when you need a simple axe: -i, for interactive.
For example, if you run rm -i file1 file2 file3, you’ll need to confirm that, indeed, you want to remove every single file. It adds another level of security, in case you wanted to delete a simple file and you end up trying to delete your home directory. Been there, done that; lesson learned. That’s why I like to use the three tools mentioned above with the option -i by default.
If you want to do the same, simply create these three aliases in your favorite shell:
alias cp='cp -i -v'
alias mv='mv -i -v'
alias rm='rm -i -v'
I also added the verbose option -v to display what’s going on.
These aliases will directly replace the basic tools, always applying the two options -i and -v. If you don’t want to apply them and use the raw tool, you can add a backslash \ before its name.
For example, even if you’ve aliased rm as above, running \rm will bypass your alias and run the CLI without any option. Thanks to this trick, you can easily create other aliases if you think that some CLIs would be better if they would always use some options by default. For example, ls could be aliased to ls -lah.
Another good practice which might save your life: when you try to delete a directory, don’t use the all too common rm -rf. The -f option will force removing everything, which is rarely a good idea. First, try something like rm -r. Be gentle. Don’t force things. This might save your life; it saved mine multiple times.
Other Minimal Tools
What I call “minimal tools” are CLIs respecting more or less the Unix philosophy: each program must do one thing well. Of course, this “one thing” can include a lot of things (it depends on how you define the “thing”), so keep in mind that it’s a subjective concept. That’s great, because, let’s face it, this whole article is subjective anyway. Let’s dive deep even more into my subjectivity!
What’s Better Than a tree?

The CLI ls is great to display files and directories, but it’s not possible to display multiple layers of the filesystem in a friendly manner.
Many applications meant to manage your filesystem represent it as a tree. It’s a common and practical way to visualize your data. That’s exactly what the CLI tree can do: it will display every file, directory, and sub-directories recursively. The root of the tree will be the current working directory by default, or any other directory if you give it as argument.
This tool has many interesting options, like -d to only display the directories, for example.
When You Search, You Must find
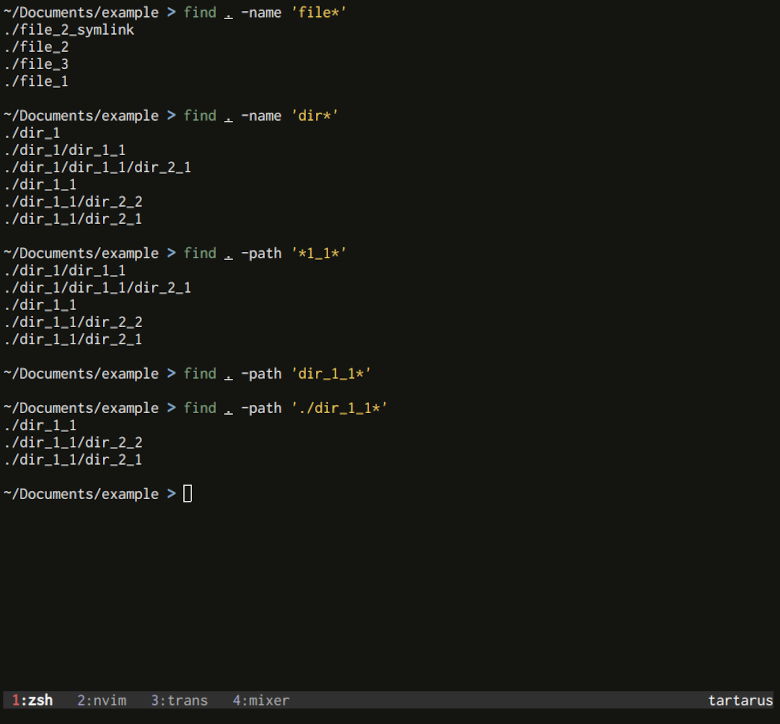
There is an essential functionality missing for managing our files: a way to search files or directories. This is the purpose of the CLI find; it’s a bit more complex to use than the other tools we’ve seen until now, but it’s also very powerful.
For example, to find the file named file1 in the directory dir1 recursively (find will also search in the subdirectories), you can run the following:
find dir1 -name file1
If there is no directory name given (for example find -name file1), find will search by default in the current working directory and all its subdirectories.
The expression -name is one filter among many you can use. For example, if you want to match the path of a file (or directory) instead of its name, you can use -path.
To learn more about find and the crazy amount of stuff you can do with it, I’ve written another article about it.
Fuzzy Find with fzf
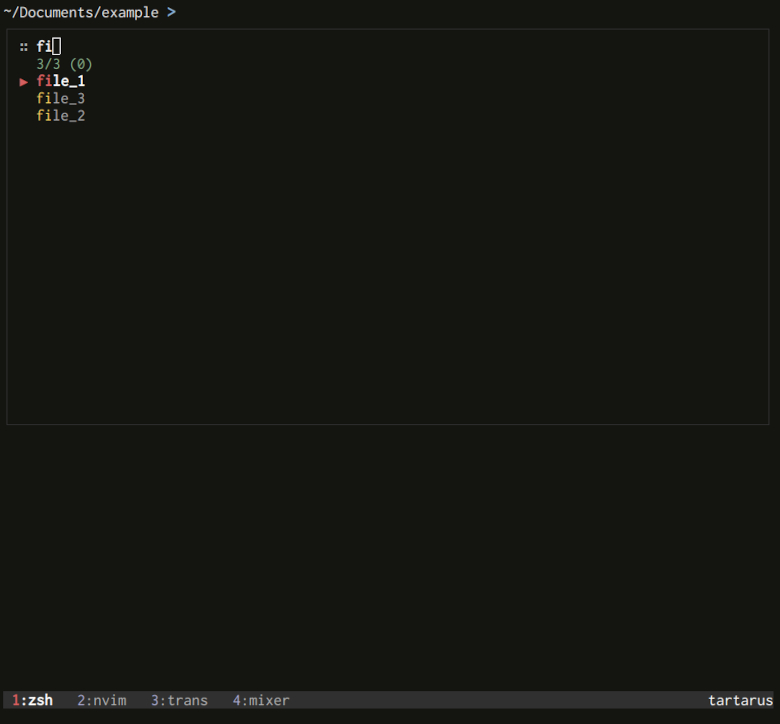
The CLI fzf is the crown jewel of my shell experience. And not only for file management. In that area, it can be interfaced with your shell and bring two useful keyboard shortcuts to find whatever files or directory you want. If you use Bash, Zsh, or even Fish, you’ll have access to these two keystrokes:
| Keystroke | Description |
|---|---|
CTRL-t | Fuzzy search any file in the current working directory and subdirectories. |
ALT-c | Fuzzy search any directory in the current working directory and subdirectories. |
Fuzzy searching is a bit more easy to use than regex pattern, because you’ll try to match strings approximately. It’s a powerful tool; if you want to know more about it, I’ve made a couple of videos explaining its shattering power. This tool is so godlike, you can come with your own, customized file management tool with a minimum of configuration. You’re in luck: that’s exactly what I explain in my videos!
And no, I never exaggerate anything.
File Management in Your Editor
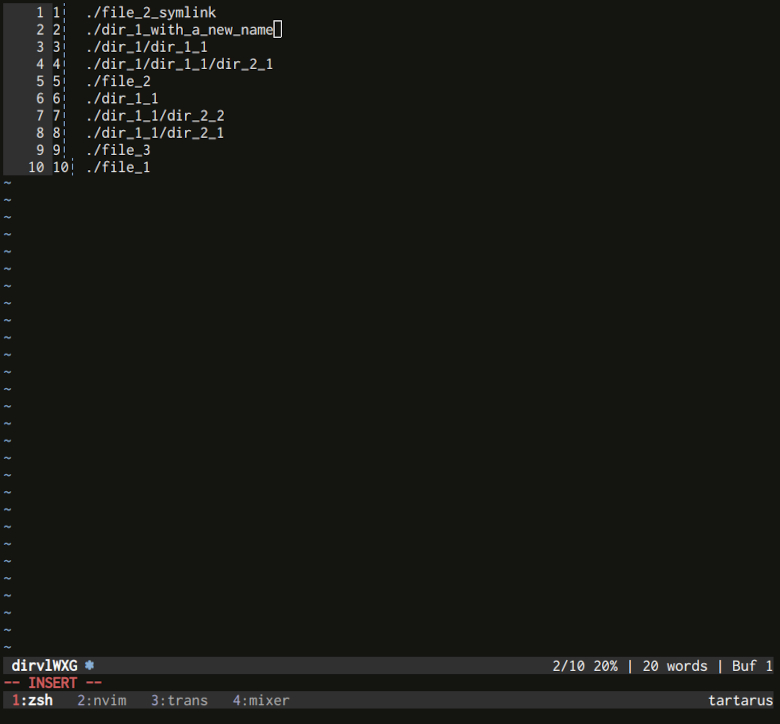
The tools cp, rm, and mv are great to copy, remove, and move (or rename) files, but it’s difficult to use them for doing these operations on a large amount of files or directories. You can use some globing, sure, at least for deleting, moving, and copying stuff. Even so, for the last two, you’ll need to find a way to create effectively the paths you want to copy or move to. And what about renaming?
It’s where vidir shines: to do bulk operations on your precious files. In practice, you modify a list of files and directory paths, directly in your favorite shell editor. The modifications will then become a reality in your filesystem.
By default, vidir will pick the editor set up to the environment variable $EDITOR or, if it’s not set, $VISUAL. Of course, in my opinion, it should be Vim. But it’s only my opinion.
Again, I’ve done a video about vidir so I won’t speak about it in details here. Using it without any argument will allow you to modify the paths of all the files and directories of your current working directory (but not recursively in the subdirectories). You can also pass a list of files you want to rename, move, or delete, by passing all the file paths to the tool, using the good old pipe. For example:
find dir1 | vidir -
You’ll then be able to delete, move, and rename all the files, directories, and subdirectories of dir1 using vidir. If you use Vim, you’ll have access to the whole search and replace tools to do so. I love it, and I use it all the time.
The Venerable tmux
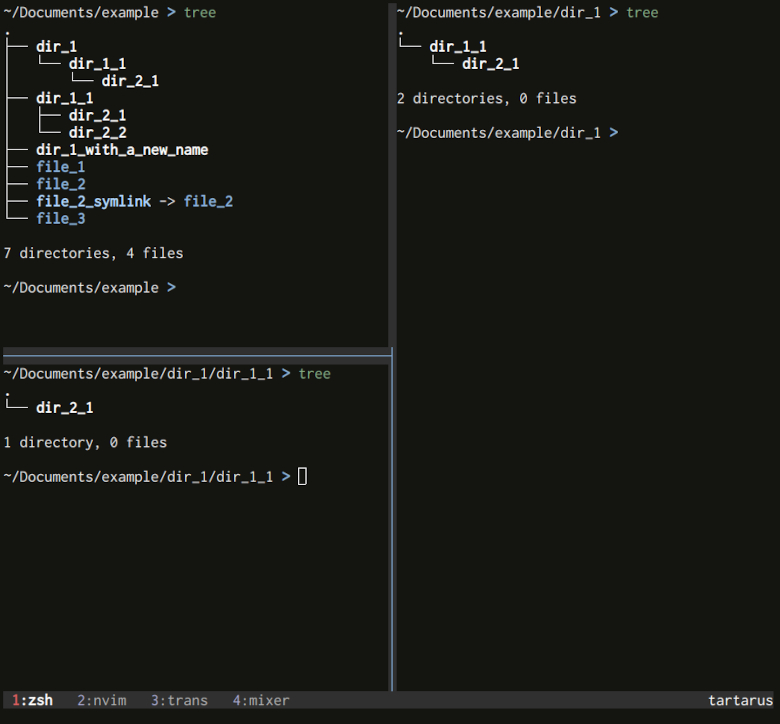
Alright, tmux is not the best example when it comes to the famous Unix philosophy: you can do a lot of unrelated stuff with it. That said, regarding file management, it allows you to have multiple shell in one window of your terminal. It’s convenient if you want to access to multiple paths in your filesystem at once.
To use the different shells’ working directories from one pane to another, I like to use the tmux plugin extrakto. With it, it’s very easy to copy and paste whatever info from one tmux pane to another, including file or directory paths.
I’ve already covered tmux at length in another article. You’ll find many tips in there.
Visualize Your Filesystem with TUIs
We’ve only seen, until now, CLIs with a simple (and for some, austere) textual interface. Terminal User Interfaces (TUI) is somehow between the GUI and the CLI: it’s more visual than a pure textual interface, it runs in the terminal, and, like CLIs, it often offers good keystrokes to be manageable only with a keyboard.
Being able to visualize part of your filetree can help you when you want to navigate, copy, or move files. Personally, that’s exactly what prevented me, for years, to only use CLIs for managing my files and directories. That said, I discovered that this inconvenience was more a question of habit than a lack of efficiency. To me, using a TUI (or a full-blown GUI) is not necessary when using all the tools I’ve described earlier together.
That said, I also know that transitioning between GUIs to CLIs can be difficult. That’s why TUIs are great to smoothly transition from the world of graphical interfaces to the magical shell world.
Vim with netrw
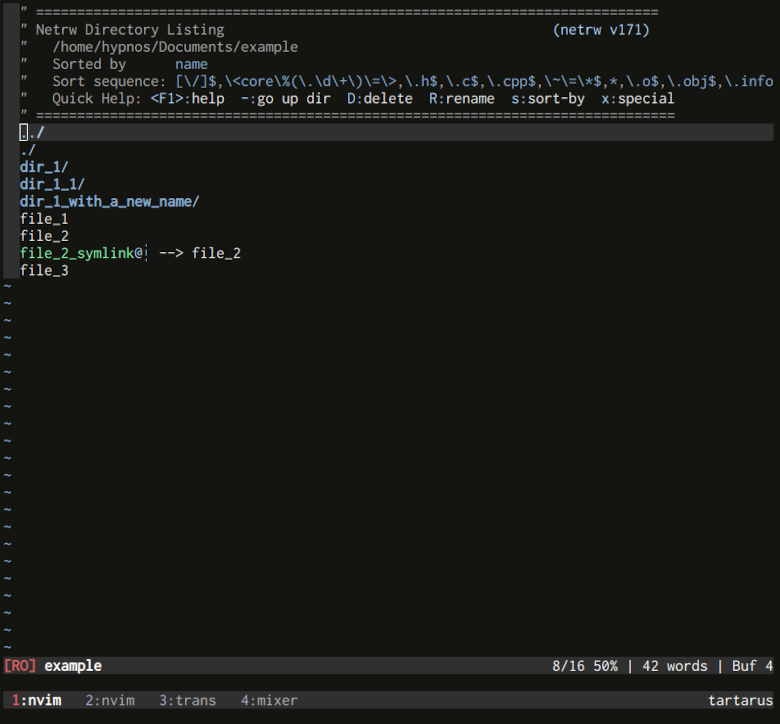
Vim comes often by default with a file manager called netrw. With this tool, you can create, rename, move, delete files and directories quite easily. If you already use Vim, you might want to look at it.
Again, I won’t describe netrw in details here because I already did it in another article.
vifm
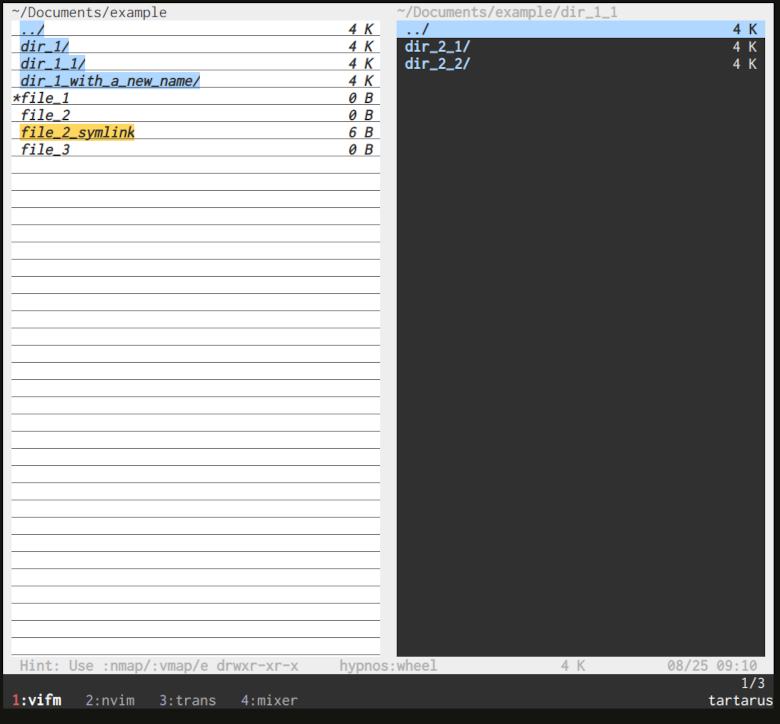
The tool vifm is one of my favorite TUI to manage files. It tries to use Vim keystrokes to manage files and directories; it is similar to vidir at time, coupled with a powerful way to navigate through your filesystem. Don’t be mistaken, however: vifm can do way more than vidir, but it’s also more complex to use.
Here are some basic shortcuts to help you begin with this great TUI:
| Keystroke | Description |
|---|---|
j | Move to the next item in the current directory. |
k | Move to the previous item in the current directory. |
h | Move up to the directory tree (parent directory). |
l | Move down to the directory tree (child directory). |
TAB | Switch pane. |
t | Select a file or directory. ESC to unselect. |
cw | Rename (change word) the file under the cursor, or the selected ones. |
dd | Delete the file under the cursor, or the selected ones. |
y | Yank (copy) the file under the cursor, or the selected ones. |
p | Copy the yanked files to the current directory. |
P | Move the yanked files to the current directory. |
v | Switch to visual mode (another way to select files and directories). ENTER to validate, ESC to cancel. |
You can also run some commands in vifm. To switch to the COMMAND-LINE mode, you need, like in Vim, to hit the colon : key, and then type your command.
| Command | Description |
|---|---|
:mkdir <dir> | Create the directory <dir>. |
:touch <file> | Create the file <file>. |
:quit | Quit vifm. |
Ranger
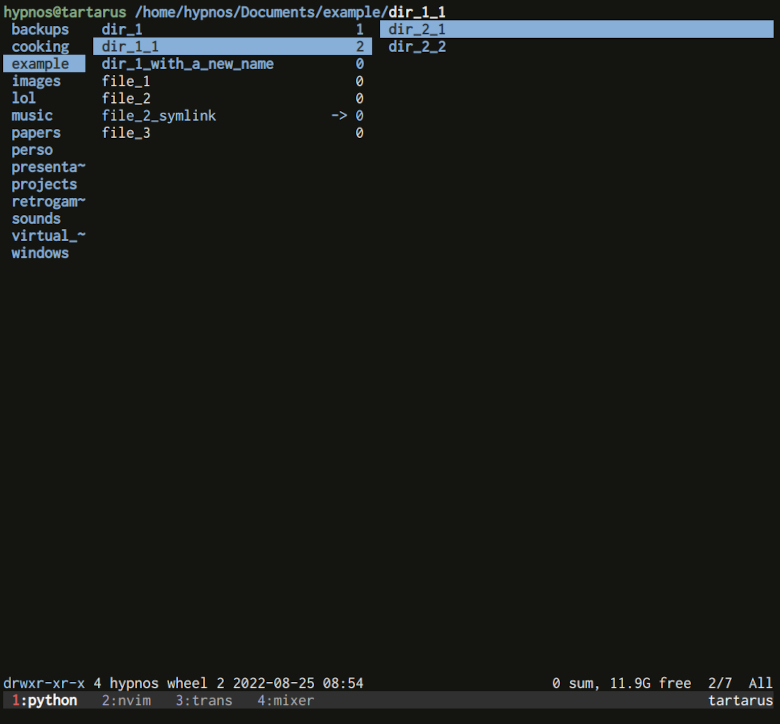
Ranger is an older TUI to manage your files and directories. Like many others, it’s highly customizable. It can display three levels of your filesystem at once: the parents, siblings, and children of the current working directory. It can also display a preview of the file under the cursor by default,
If you want to try Ranger, here are some basic keystrokes you can use:
| Keystroke | Description |
|---|---|
? | Open the manual. You can then choose to see the list of keystrokes, commands, or settings. |
j | Move to the next item in the current directory. |
k | Move to the previous item in current directory. |
h | Move up to the directory tree (parent directory). |
l | Move down to the directory tree (child directory). |
yy | Yank the selection. |
dd | Cut the selection. |
pp | Paste what was yanked or cut. Nothing will be overwritten but renamed. |
Like vifm, there is also a COMMAND-LINE mode in Ranger. You can switch to it by pressing the colon : key:
| Command | Description |
|---|---|
:rename <newname> | Rename the current file to <newname>. |
:mkdir <dir> | Create the directory <dir>. |
:touch <file> | Create the file <file>. |
:quit | Quit vifm. |
I find ranger more complicated to handle and customize than vifm, even if I spent more time with ranger. Nowadays, I don’t use it anymore.
nnn
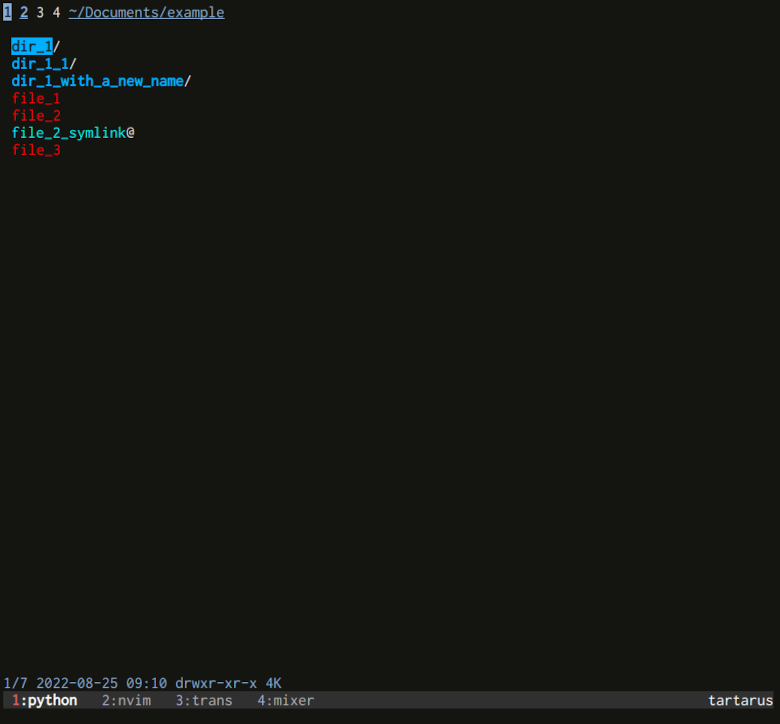
The tool nnn is another simple TUI to manage your filesystem. When you open it, you’ll have only one pane this time (contrary to vifm and Ranger), but you can switch between 4 different contexts. Think of a context as a precise location in your filesystem, with whatever else you’ve done in there (like filtering the list of files and directories). At the beginning, only one context is open; you can use the keys from 2 to 4 to open new ones (or using TAB or SHIFT-TAB). When you open a new context, it will be the copy of the previous one.
Each context can point to a different location in your filesystem. On top of the context, you have the session, which can save your contexts to be used later.
Mostly, nnn use the usual shell tools we’ve seen at the beginning of this article to perform the usual operations: copy, delete, and so on.
As always, here are some keystrokes which will help you experiment with nnn:
| Keystroke | Description |
|---|---|
? | Show the list of keybinding. |
j | Move to the next item in the current directory. |
k | Move to the previous item in the current directory. |
h | Move up to the directory tree (parent directory). |
l | Move down to the directory tree (child directory). |
CTRL-R | Rename the file under the cursor. |
SPACE | Select the file under the cursor. |
p | Copy the selected files in the current directory. |
v | Move the selected files in the current directory |
x | Delete the selection. |
] | Launch the command prompt. You can use your usual shell commands (like touch or mkdir) to create whatever you want. |
! | Launch a shell process, child of nnn. To come back to nnn, simply close the shell. |
1 to 4 | Change the current context. |
q | Quit the current context. Quit all the context to quit nnn. |
Q | Quit all open contexts. |
You can also use interesting options when launching nnn from your shell:
| Option | Description |
|---|---|
-d | Display more details for files and directories. |
-e | Open text files using the $EDITOR or $VISUAL environment variable. |
-S | Persistent session: closing and reopening nnn with this option will bring back all your contexts. |
This tool has many other interesting functionalities, like cd on quit, to quickly change your shell working directory using nnn. The tool has also a couple of interesting plugins you can install to increase its might.
Rover
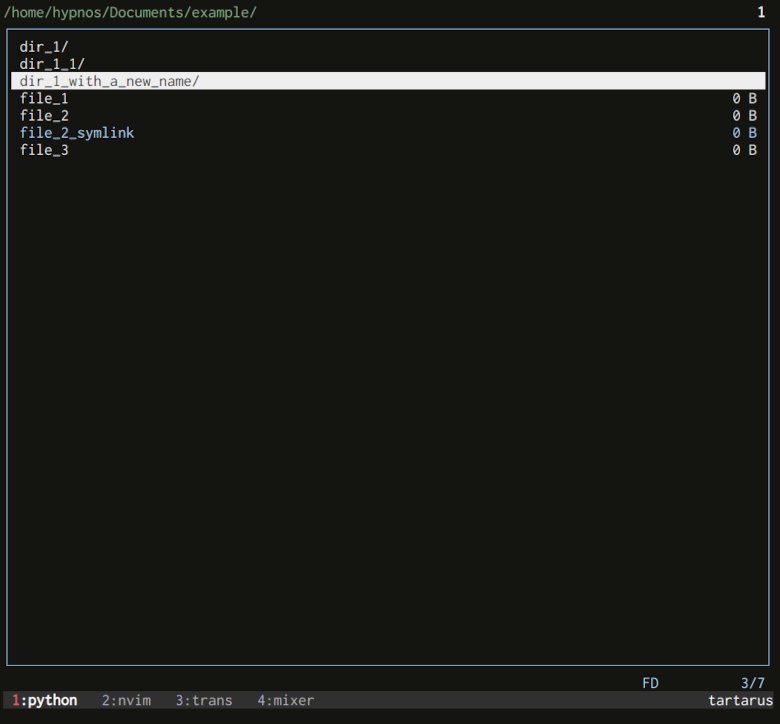
If you want a lightweight tool to navigate through your files and directory visually, Rover is the TUI you need. You can use the usual keybinding almost every other TUI uses (h,j,k,l,/…) to navigate quickly through your files. When you quit the TUI (or press ENTER), you’ll come back victorious in your favorite shell and, more importantly, in the directory you’ve navigated into using Rover.
Here are many keystrokes to help you begin with Rover. As I said, it’s a simple tool, so it covers almost everything:
| Keystroke | Description |
|---|---|
? | Show Rover’s manual. |
j | Move the cursor down (uppercase: down 10 lines). |
k | Move the cursor up (uppercase: up 10 lines). |
g | Move the cursor to the top of the listing. |
G | Move the cursor to the bottom of the listing. |
l | Enter the selected directory. |
h | Move to the parent directory. |
H | Move to the $HOME directory. |
0-9 | Change tab. |
RETURN | Open the $SHELL on the current directory. |
SPACE | Open the $PAGER with the selected file. |
e | Open $VISUAL or $EDITOR with the selected file. |
/ | Start incremental search (RETURN to finish). |
n | create new file. |
N | Create new directory. |
R | Rename selected file or directory. |
D | Delete selected file or (empty) directory. |
m | Toggle mark on the selected entry. |
M | Toggle mark on all visible entries. |
a | Mark all visible entries. |
X | Delete all marked entries. |
C | Copy all marked entries. |
V | Move all marked entries. |
q | Quit Rover. |
I never heard of it before writing this article, but I really like its simplicity. It pushed me, with a lot of emotions, to say goodbye to vifm.
GNU Midnight Commander
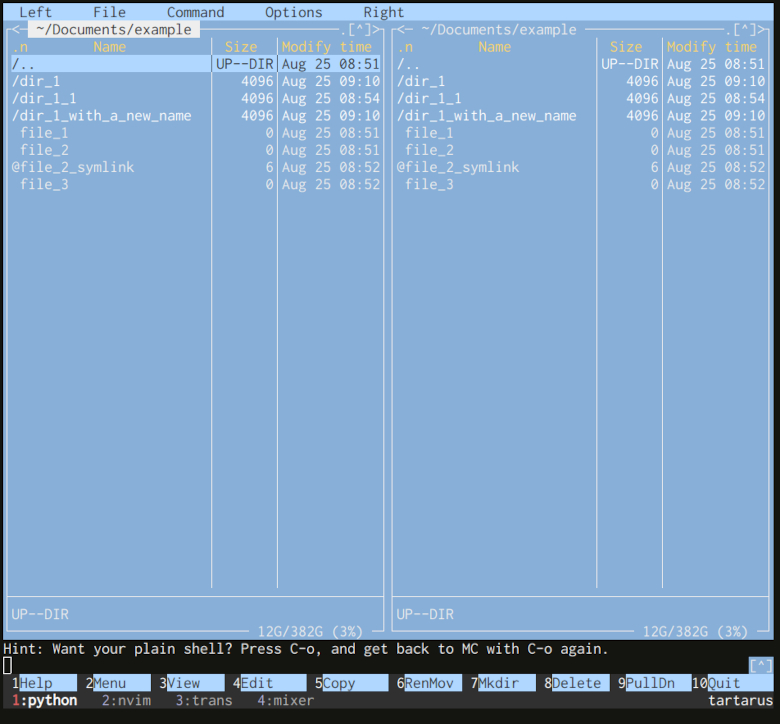
We quit the realm of Vi-inspired file managers with the venerable GNU Midnight Command. This is the grandparent of many other TUIs out there; this fact will jump to your face as soon as you launch it. This tool looks more like a file manager from the MS-DOS era, where you have a good mouse support, and the usual menu on top of the application.
I never used it seriously (I don’t have any nostalgia for the MS-DOS era, especially when I was struggling to run my games on there), but I include it in case you’d like something a bit different.
Bookmark File Managers
There is another category of CLIs which could help you manage your precious files and directories: bookmark managers.
z
The CLI z tracks the directories you’re using the most often (the most “frecent” directory), and allows you to jump to them easily. For example, if you run z dir1 dir2, you’ll move to a “frecent” directory matching both regex dir1 and dir2.
You can also use a couple of options with z:
| Option | Description |
|---|---|
-c | Restrict the matches to the subdirectories of the current directory. |
-e | Don’t move anywhere, just output the best match. |
-l | Only list all directories matching the regex(es). |
-r | Match by rank only. |
-t | Match by recent access. |
-x | Remove the current directory from the datafile. |
Bashmarks
Bashmarks is a simple bash script allowing you to create bookmarks and access them easily. You can also display your bookmarks and delete them; that’s basically all.
Simple and potentially useful.
bm
The tool bm is similar to z, except that it doesn’t automate anything. You need to actively add bookmarks, list them, and choose whatever directory you want to navigate to. Like Bashmarks, it’s a very simple tool.
Master of Your Filesystem
There are many others tools to manage your filesystem. For example, I also use bd with Zsh to come back easily to parent directories which are multiple levels up. I also use the directory stack or the shell history quite heavily. You’ll find these tips (and many more) in this article about Zsh.
What did we see in this article?
- We took a quick look at the most comment CLIs to manage files and directories in the shell, like rm, cd, touch, or mkdir for example.
- Looking at the documentation of your CLIs and TUIs is the best way to harness their power.
- Following some best practices to name your files and directories on a Unix or Linux-based system is essential. No spaces, no uppercase, no special characters (except underscores and hyphens).
- There are many other CLIs to help you manage your files: for example tree, fzf, vidir, tmux…
- If you come from the GUI world, using TUIs can help you transition from your desktop interface to the shell more easily.
- There are many good TUIs out there to manage your files and directories: vifm, ranger, Rover, nnn…
- You can also use bookmarks to access easily specific nodes of your filetree.
Don’t be fooled: it’s not because a tool doesn’t look user-friendly that it’s less comfortable (or efficient) to use. Keep your mind open, try, and experiment enough to find the good shoes for your specific feet.