
Another boring day at MegaCorpMoneyMaker, the company you’re working with. You have the most exciting task anybody would ask for: modifying the README of an obscure microservice due to recent changes from your team. Looking at the project, you realize that it has way too many files, and worse, that the readme file is nowhere to be found!
Anxious, you ask Davina, your colleague developer, how to find this file. She tries to help:
“Let’s see. It’s a markdown file, so it should have the extension “md”. It’s also a plain text file, so we can exclude directory of our search. Maybe using a regular expression would work well, trying to search anything which have the substring “read”, or even “me” if we have no luck”.
You stop Davina. You have no clue how to perform these searches, except using the crappy search and find functionality of your desktop manager.
Davina looks at the room full of disheartened developers. She begins to shout out:
“If anybody is interested to explore the CLI find together, let’s begin in 10 minute on my computer!”
Half of the room joins, some interested, some trying to fight their boredom. This article is the transcription of this magical day, written in stone like the 10 commandments. More specifically, we’ll cover the following:
- The general syntax of find, and what are test and action expressions.
- How to search files by name, type, permissions, and users.
- How to delete automatically the files found.
- How to run any command on the result.
- How to manipulate the output.
- How to write and format the output in files.
- What are find’s operators you can use.
- The differences between find and the CLI fd.
As indicated in the title, we’ll focus on GNU find in this article. If you don’t have it, I’d recommend you to install and use it, instead of crappiest versions (looking at you, BSD find).
Why learning this old tool, you might wonder? You can find this tool (pun intended) almost everywhere: remote servers, docker containers, you name it. It might be the only available way to find files. For your local machine, there are more modern options (we’ll cover one of them in this article).
The CLI find has more than one trick in its sleeve; but it doesn’t mean we should use it for everything. As always with CLIs, it’s important to be careful not to do some irreversible changes in our filesystem.
Also, I recorded two videos on this topic if you prefer watching them instead of reading this article; you’ll find them at the end.
Last thing: you can download the companion project if you want to follow along and try by yourself the different commands. I’d recommend you to do so, to remember what we’ll see here, and be able to use find in different contexts.
It’s about time: let’s find these files!
The Basics of find
Let’s look first at find’s general syntax:
find [options] [starting_directory] [expressions]
What are these different elements?
| Element | Description | Default |
|---|---|---|
[options] | Options are arguments about symlinks and search optimization. | None |
[starting_point] | List of directories to search through. The subdirectories are recursively included. | Current directory |
[expressions] | List of expressions with their (often required) values. | None |
Nothing is mandatory here: running find alone will give you some output.
The [options] are not the most useful elements you’ll use over and over with find; we won’t focus on them in this article. Instead, we’ll look mostly at the [expressions]. They are queries describing how to match files, or what action to perform on these files. They’re always prefixed with a single dash - (like -name for example).
Here are the different categories of expressions:
| Category | Description |
|---|---|
| Test expressions | Most common expressions. They’re used to filtering your files. |
| Action expressions | Expressions used to perform an action on each file found. |
| Operators | Boolean operators to manage the relationships between the different expressions. |
| Global options | Options changing the behavior of the test and action expressions. |
| Positional options | Options changing the behavior of the test and action expressions directly following them. |
When using multiple expressions without specifying any operator, the AND operator is implicitly used. We’ll look at that in a section below.
For you to understand my obscure rambling, nothing beats an example. You can try to run the following in the companion project to see what it does:
find mouseless -name '*.jpg' -perm '664'
Let’s look at each element of the command more closely:
| Part | Description |
|---|---|
mouseless | Starting directory of the search. All subdirectories will be parsed to find the files. |
-name | The test expression -name search files by… name. Flabbergasting. |
*.jpg | The value given to the expression -name. Here, we only want to match JPG files. |
-perm | Another test expression to search files according to their permissions. |
664 | Value given to the expression -perm. Here, we only want files with permissions 664. |
To drive the point home: we’re searching in the directory mouseless (and all its subdirectories) files with extensions jpg which have the permissions 664.
Let’s look at the value *.jpg of the test expression -name: we use single quotes around it here. This is important: it forbids your shell to expand the wildcard *, letting find doing it. I’d recommend to always use single quotes when giving values to expressions: it will save you some headaches down the line, or you might wonder why the results are not the ones you expect.
There are only two JPG files in the entire project, and only one with the permissions 664. As a result, you should get this output:

As you can see, by default, find displays the relative path of each result.
You don’t have to specify a starting directory; by default, find will begin the search in the current directory. As a result, the two following commands are equivalent:
find -name '*.jpg' -perm '664'
find . -name '*.jpg' -perm '664'
That said, it’s always clearer to specify the starting directory, to avoid any confusion.
Test Expressions
Test expressions specify what files you want to match (including directories). Here are the most useful ones:
Find Empty File and Directories
Our first test expression is easy: -empty will only find empty files and directories. It doesn’t need a value.
Let’s try to run the following in our companion project:
find . -empty
Here’s the output of the command:

We don’t have empty directories in there (Git won’t let me push some), but if it was the case it would appear in the results. You can try to create it yourself and see what happens.
Find Files by Names
More often than not, you’ll want to find files depending on their filenames (or their entire filepaths). That’s great, because we’ve a set of test expressions dedicated to this task.
Find by Filename
The expression -name finds files and directories by filename. If you want to use regular expressions, too bad: only shell patterns (also called glob operators) are allowed here. More specifically, you can use the following globs: *, ?, or [].
As an example, let’s try to run the following in our companion project:
find . -name '*.tex'
This command will try to find every file with extension .tex. The output:

Find by Filepath
The expression -path filter files and directories depending on their filepaths. Like -name, it doesn’t accept regexes as value but glob operators.
For example:
find . -path '*/headers/*'
Here’s the result:
We’ve now every file which have /headers/ in their filepaths.
Find Filepaths Using Regular Expressions
If you want to use a regex to specify the filepaths you want, the expression -regex is here for you.
You can also use the positional option -regextype before -regex, to specify the regex engine you want to use. To output a list of regex engines supported, you can run find . -regextype dummy:

For example, If I want to find every TEX and JPG files, I can try to run the following:
find . -regex '.*(tex|jpg)$'
But it won’t work: by default, find uses the emacs regex engine, which doesn’t include all the metacharacters used above. The [extended regular expressions (using the egrep engine) is more powerful:
find . -regextype 'egrep' -regex '.*(tex|jpg)$'
This time, we get the output we want:

Case Sensitivity
If you want your expression’s value to be case-insensitive, you can add the prefix i to the expression’s names seen above. For example: -iname, -ipath, or even -iregex.
Let’s try to run the following in the companion project:
find . -name 'make*'
Nothing will be output, even if we have a file named Makefile in our project. But the following will work:
find . -iname 'make*'
Here’s the result:

Find by Type of File
If you want to search your files by type, you can use the expression -type followed by one of these values:
| Value | Description |
|---|---|
f | Regular file |
d | Directory |
l | Symlink |
For example, if you run the following:
find . -name '*ge*' -type d
We get only one output because we only want directories.
Find by Permissions
You can also find files depending on their permissions: whether they’re -writable, -executable, or -readable for the current user; all three can be used as test expressions.
If you want to find files with a specific set of permissions for all kind of users, you can use -perm. Its value can be:
- A string beginning with
/(using the boolean “OR”) and followed by a series of rules. For example:-perm '/u=w,g=x'(writable by the owner, or executable by the group). - A string beginning with
-(using the boolean “AND”) and followed by a series of rules. For example:-perm '-u=w,g=x'(writable by owner, and executable by the group). - An octal number, for example:
644(see file permissions).
We’ve already seen an example of this expression in the first section of this article.
Filtering by Owner or Group
To find files depending on their owners, we can use the expression -user, where the value is a username. For example, find . -user myuser.
You might have guessed it: to filter by group, we can naturally use the -group expression. For example, find . -group mygroup.
A Brief Summary of Test Expressions
We already covered a lot of ground here! Let’s summarize the different test expressions we’ve seen in this section:
| Expression | Description | Example(s) |
|---|---|---|
-empty | Only return empty files or directories. | find . -empty |
-name | Search by filename. | find . -name '*.jpg' |
-iname | Search by filename (case-insensitive). | find . -iname '*make*' |
-path | Search by filepath. | find . -path '*/headers/*' |
-ipath | Search by filepath (case-insensitive) | find . -ipath '*readme*' |
-regex | Search by filepath using a regex. | find . -regex '.*tex' |
-iregex | Search by filepath using a regex (case-insensitive). | find . -iregex '.*readme.*' |
-regextype | Placed before -regex, specify the regex engine to use. | find . -regextype 'egrep' -regex '.*(tex|jpg)$' |
-type | Search files by their types (use d, f or l as value). | find . -type d |
-writable | Output files which are writable for the current user. | find . -writable |
-executable | Output files which are executable for the current user. | find . -executable |
-readable | Output files which are readable for the current user. | find . -readable |
-perm | Output files depending on specific permissions. | find . -perm -u=w,g=e, find . -perm 664 |
-user | Search files by user. | find . -user myuser |
-group | Search files by group. | find . -group sudo |
Action Expressions
Expressions are not only there for filtering your search. We can also perform some actions on each file found.
Deleting Files
You can easily delete the files and directories found using the -delete option. For example, the command find . -name "*.jpg" -delete will delete all JPG files.
This is a dangerous expression: there is no prompt to confirm if you want to delete your files, they’re just gone. I never use it personally, it’s too frightening for my little heart.
Running a Command on Each Result
You can also run any command you want on each file found. The following expressions enable us to reach this glorious goal.
Running a Command in the Working Directory
The expression -exec allows us to run a command on each file found, from the current working directory.
The characters {} are used as placeholder for each result; they will be expanded with the filename of each file found. You also need to use ; to end the command (it allows us to add other commands afterward, which doesn’t happen often).
Here are a couple of examples:
| Example | Description |
|---|---|
find . -exec 'basename' '{}' ';' | Run the command basename for every result of the search. |
find . -type f -exec 'rm -i' '{}' ';' | Prompt you for each file to delete it. Safer than using the expression -delete. |
find mouseless -exec bash -c 'basename "${0%.*}"' '{}' ';' | Using bash -c allows us to expand parameters. We use here ${0%.*} to delete the file extension of each result. |
Again, the single quotes are important here: we don’t want our shell to expand our placeholder (or even ';') before find has the chance to process the input.
You can also use the expression -ok. It’s the same as -exec, except that find will prompt you to make sure that you want to run the command for each file. For example:
find . -type f -ok rm '{}' ';'

Running a Command in the Starting Directory
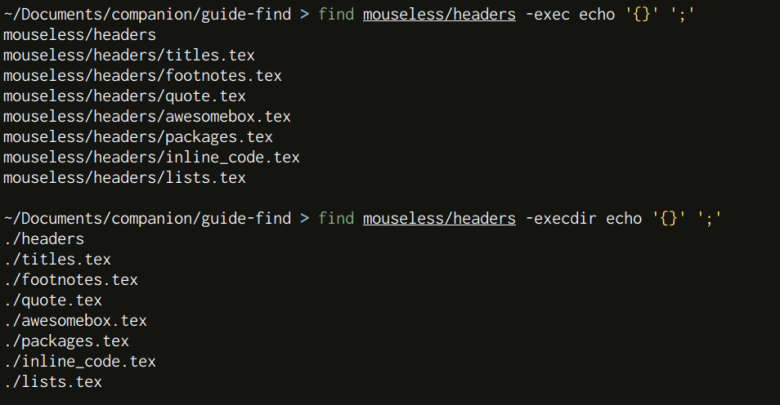
We saw that -exec and -ok can run commands on each result in the working directory. If you want to run these commands in the directory where the file found is, you can use respectively the expressions -execdir and -okdir.
For example:
find mouseless/headers -execdir echo '{}' ';'
Here’s a little preview to show the difference between -exec and -execdir:
Another example, from The Real Life™ this time: in a past long gone, I wanted to convert a bunch of images to black and white. Using imagemagick, I came up with the following command:
find -name '*.jpg' \
-execdir bash -c \
'convert $0 -colorspace Gray ${0%.*}_bw.jpg' {} \
';'
It copies the files, convert them to black and white, and add the suffix _bw.jpg to the original filenames. Neat! You can see it here in action:

Formatting Find’s Output
You urgently need to format find’s output? The following expressions will become your best friends:
| Expression | Description |
|---|---|
-print | This is the default action used when you don’t specify any. It simply prints each filepath found. |
-printf | Print each result following a format given as value. |
-print0 | Replace the separator between each output from newlines to null characters. |
-ls | Print each result like the command ls -dils would do. |
The expression -print0 can be quite useful if you want to pipe your results to xargs -0 for example. Many CLIs give you the ability to work with null characters as separators, which can be easier than dealing with newlines.
Let’s look a bit more closely at the expression -printf:
find . -type f -printf 'Level: %d | File: %p\n'
The placeholder %d prints the depth of the file in the filetree, and %p prints the filepath of the file found. Here’s the result:

Writing Find’s Output to a File
You can also use a bunch of action expressions to write find’s output to a file instead of displaying it in your shell. You just need to prefix the expressions we saw above with a f.
For example: -fls, -fprint, -fprint0 or -fprintf.
You can pass the filepath you want to write to as value of these expressions:
find . -fprintf myfile 'Level: %d | File: %p\n'
The result:

A Brief Summary of Action Expressions
Again, let’s summarize what action expressions we saw in this section:
| Expression | Description | Example(s) |
|---|---|---|
-delete | Delete each file without prompt. Be careful: it’s not possible to go back. | find . -delete |
-exec | Run a command on each file found. | find . -exec basename '{}' ';' |
-ok | Prompt you to run a command on each file found. | find . -exec rm -ri '{}' ';' |
-execdir | Like -exec, but the filepaths are relative to the starting directory. | find mouseless -execdir echo '{}' ';' |
-okdir | Like -ok, but the filepaths are relative to the starting directory. | find mouseless -okdir echo '{}' ';' |
-print | Print each result. Default action expression used to output the results. | find . -print or find . |
-printf | Print each result using a given format. | find . -printf 'Level: %d\n' |
-ls | Print each result like the command ls -dils would do. | find . -ls |
-print0 | Like -print, but replace newline separators with null characters. | find . -print0 | xargs -0 file |
-fprint | Print the results in a file instead of stdout. | find . -fprint myfile |
-fprintf | Like -printf, but print the result to a file instead of stdout. | find . -fprintf myfile 'Level:%d'\n |
-fprint0 | Like -print0, but print the result to a file instead of stdout. | find . -fprint0 myfile |
-fls | Like -ls, but print the result to a file instead of stdout. | find . -fls myfile |
Using null characters can be useful when using xargs and your filenames have spaces for example. Without the null characters, xargs would consider any space as a separator, effectively trying to run the command on the results, but using only part of the filenames.
Operators
Test and action expressions are really useful, but you’ll see quickly their limitations when you put them together. What if you want to filter everything which doesn’t have a specific filename or filepath for example?
We can add operators to our expressions to make find even more powerful. Here are the most useful ones:
| Operator | Description |
|---|---|
! | Reverse the test expression following it. |
-or or -o | Logical “OR”. |
-and or -a | Logical “AND”. It’s the default if no operator is given. |
, | Separate multiple expressions, only traversing the whole filetree once. |
The usual examples:
| Command | Description |
|---|---|
find . '!' -path '*headers*' | Output every file except the ones having headers in their filepaths. |
find . -name '*.css' -or -name '*.md' | Output every file with extensions css or md. |
find . -name '*s*' -and -type d | Find directories with names finishing with s. |
find . -name '*s*' -type d | Equivalent to the previous example. |
And a last example: a command writing every markdown filenames in the file md_files, and every CSS filenames in the file css_files, while traversing the filetree once:
find . -name '*.css' -fprint css_files ',' -name '*.md' -fprint md_files
The CLI fd, an Alternative to find
The CLI find is a great tool, but it’s also old; it doesn’t take into consideration all the other tools we use nowadays. For example, it’s not easy to automatically skip the files ignored by Git.
If you want a more modern experience, you can use an alternative, something like the excellent fd.
I think it’s always good to know the OG tools (like grep or find) because, as I was writting it in the introduction, they’re often available everywhere, or they can be installed easily, even on docker containers. If you know how to use find, it should be easy to use more modern alternatives.
By default, fd will ignore hidden files and files in your .gitignore. It also supports regexes out of the box, without the need to use any option. The cherries on top: it’s faster, and it has colored output, similar to the CLI ls.
To give you an idea, here are some equivalent commands using find and fd. They’re not always exactly equivalent, but it’s close enough:
| find | fd |
|---|---|
find . -iname '*headers*' | fd headers |
find . -iregex '.*readme.*' | fd '.*readme.*' |
find . -iname '*headers*' | fd --glob '*headers*' |
find mouseless -name '*.theme' | fd '.*.theme' mouseless |
find mouseless/headers | fd . mouseless/headers |
find . -name '*.tex' | fd --extension tex |
find .. -name '.git' | fd --hidden '.git' .. |
find -path '*/headers/*' | fd --full-path '/headers/' |
find . -exec stat '{}' ';' | fd --exec stat |
find . -exec grep 'itemData' '{}' ';' | fd --exec grep 'itemData' |
vim $(find . -name '*.tex') | fd --extension tex --exec-batch vim |
The commands using fd were mainly pulled from its excellent README - it’s a great resource to learn how to use fd in more details. It has more quality of life improvements: different placeholders possible when using --exec to get only some part of the filepaths, parallel executions… You name it!
As I was writing in another article, fd is also great to use in concert with other tools, like fzf for examples.
Are Your Ready to Find?
If you prefer watching videos instead of reading this article, most (but not all) of the good tips provided here are also available on YouTube:
What did we see in this article?
- There are multiple types of expressions we can use with find: test expressions (filters) and action expressions (running commands on each result).
- The test expressions
-name-path, and-regexwill likely be your favorite ones to cover most needs. - To filter by type of files, we can use the expression
-typewithf,d, orl(files,directories, and symlinks). - We can also filter by permission with
-writable,-executable, and-readable. For more control:-permis here for you. - Regarding action expressions,
-execis the most versatile of all. Don’t forget to use the placeholder{}, and to add';'at the end! - If you need to be prompted for sensible operations (deleting files for example), you can use
-okinstead of-exec.
Davina finishes her demo. The participants, amazed by so many skills, ask their managers to raise Davina’s salary by 200%. This is what will happen to you too if you use find! Success, glory, and fame guaranteed. How do you think Joe Rogan went that far (arguably) in life?