
This article is the third part of a series about fzf:
Davina, your colleague developer, explained in the two previous articles of the series how to use and configure fzf for the shell. This time, she’s back to explain how to use fzf directly in the Best Editor in the Known Universe™, Emacs Vim (or Neovim).
Vim vanilla functionalities are often enough to do what we want to do, but not this time. To use fzf in Vim, we’ll have to use two plugins:
- A first plugin, coming directly with fzf. I’ll call it the “native fzf plugin” in this article.
- Another plugin, fzf.vim, adding new user commands and global options.
The plugin fzf.vim is built on top of the native fzf plugin, that’s why we’ll need to use both. They are great plugins for two reasons:
- They are not bloated. It’s not too hard to dig in the code and understand how they work.
- They are both written by the author of fzf itself, and he’s far from being an amateur.
I’ll try to clearly specify what plugin bring what functionality in this article. In fact, if you’re ready to spend more time to configure fzf in Vim, you can skip fzf.vim entirely, and only rely on the native fzf plugin.
We’ll see, in this article:
- How to install these two plugins to harness fzf power in Vim.
- The default user commands offered by the plugin fzf.vim.
- The global variables we can use to configure further the fzf integration.
- The basic functions allowing us to build our own user commands.
Are you ready to fuzzy find everything and anything? Me neither, but let’s dive anyway.
Installing the fzf Plugins for Vim
Let’s first install the two plugins we were speaking about in the introduction.
They can be installed like any other plugin; for example, if you use a plugin manager like vim-plug, you can simply add the following to your Vim config:
" fzf native plugin
Plug 'junegunn/fzf'
" fzf.vim
Plug 'junegunn/fzf.vim'
Nothing earth-shattering here. That said, the native fzf plugin is automatically installed when you install fzf itself. As a result, you can directly include fzf’s directory in your runtime path. For example, if you installed fzf with homebrew, you can add the following to your Vim config to get the native fzf plugin:
set rtp+=/usr/local/opt/fzf
If you’re using Arch Linux: you don’t need to do anything to use the native fzf plugin, it’s directly included in your Vim’s global plugin directory when you install fzf with pacman. It means that it will always be sourced when Vim starts.
It’s also interesting to note that the native fzf plugin is quite small (it’s only one file). If you decide to only use this one, your integration’s footprint will be minimal.
That’s it! Next!
The Default User Commands
The plugin fzf.vim comes with many different user commands you can use from the get-go. They allow you to search through your files to find and edit what you want.
I describe, in this section, some of the user commands I find the most useful. There are many others you can find in the plugin’s README file.
Searching Through Files
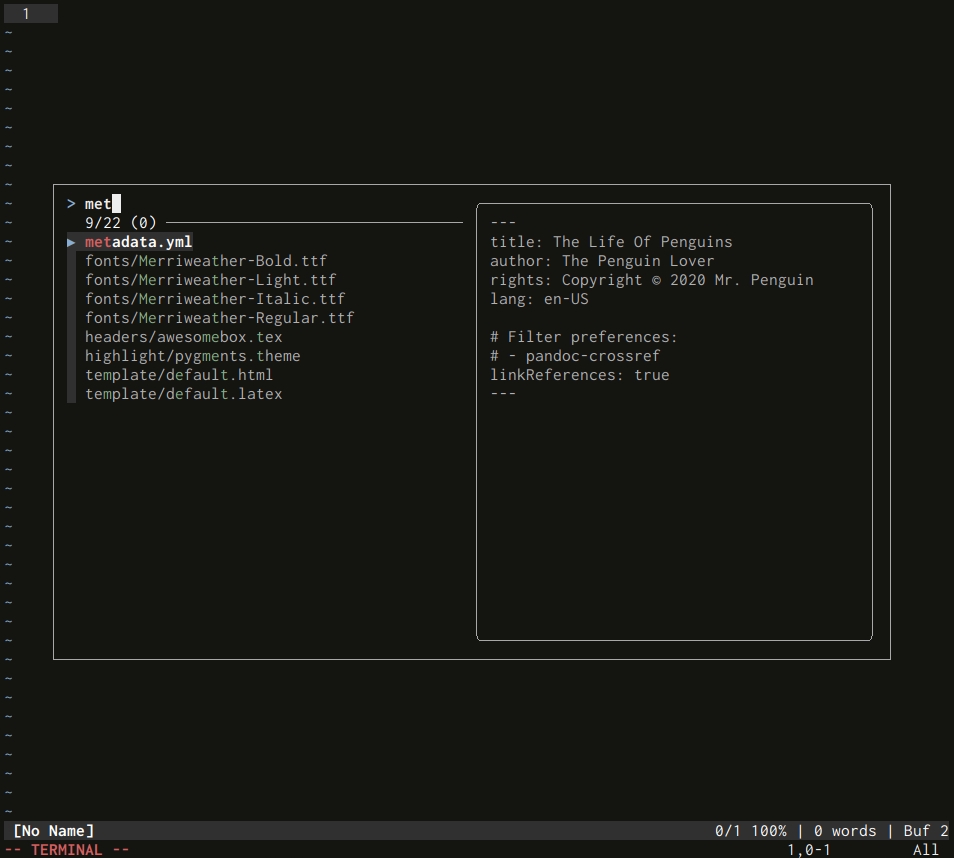
To search any file in your project by its filename, you can always use the Ex command :find in vanilla Vim. But you need to already know where the file is located in your filesystem (more or less), and it can be cumbersome to always have to type a pattern to narrow down the search.
In my opinion, it’s where fuzzy finding becomes handy. The plugin fzf.vim offers you a couple of Ex commands which can help you search the filenames you want to edit:
| Ex command | Description |
|---|---|
:Files {directory} | Populate fzf with all the filenames from the {directory}, recursively. The working directory is used if no {directory} is specified. |
:GFiles | Populate fzf with the filenames of all the files added to Git (using the shell command git ls-files under the hood). |
:History | Populate fzf with the history of open filenames. |
How these Ex commands work, you might rightfully ask?
Under the hood, the commands above run a shell command defined by the environment variable FZF_DEFAULT_COMMAND, to populate fzf with a list of filenames. It also uses the environment variable FZF_DEFAULT_OPTS to give to fzf some default options.
If these environment variables are not defined, fzf uses the CLI find to get the list of filenames it needs. If you want to know more about these two environment variables, I’ve written about them in the first article of this series.
You can also use a couple of keystrokes directly in fzf after running one of the command above. They allow you to edit the files you want to edit in new split windows or tabs:
| Keystroke | Description |
|---|---|
ENTER | Open the file in the current window. |
CTRL-x | Open the file in a new horizontal split. |
CTRL-v | Open the file in a new vertical split. |
CTRL-t | Open the file in a new tab. |
When you hit any keystroke described above, Vim will run an Ex command with the entry selected as argument. For example, when you hit ENTER after selecting the file a, Vim will run the Ex commands :edit a. If you hit CTRL-v, :vsplit will be used instead of :edit.
Since fzf runs with multi-selection on, you can hit the TAB key to select more than one file to edit them all! In that case, Vim will run the different Ex commands (:edit for example) multiple times.
Using the Fzf Ex Command
There is another, more flexible command you can use to search through your files using their filenames. This one is implemented in the native fzf plugin; as a result, you won’t need fzf.vim to use it. Here it is:
| Ex command | Description |
|---|---|
:FZF {options} {path} | Populate fzf with all the filenames from the {directory}, recursively. It also gives fzf some {options}. The working directory is used if no {directory} is specified. |
Again, both environment variables FZF_DEFAULT_COMMAND and FZF_DEFAULT_OPTS are used if they are defined.
Here’s an example:
:FZF --multi --layout=reverse-list --info=inline --pointer=→ --marker=♡
If you know how to use fzf in your shell, it’s then easy to use :FZF in Vim to search any file you want. If you want more options to feed the gluttony fzf, you can look at the first article of this series.
It’s not easy to craft more complex commands, however. For example, you’ll have a hard time to display a preview of the files, configuring the layout, or even change the syntax highlighting.
Searching Through the Content of Files
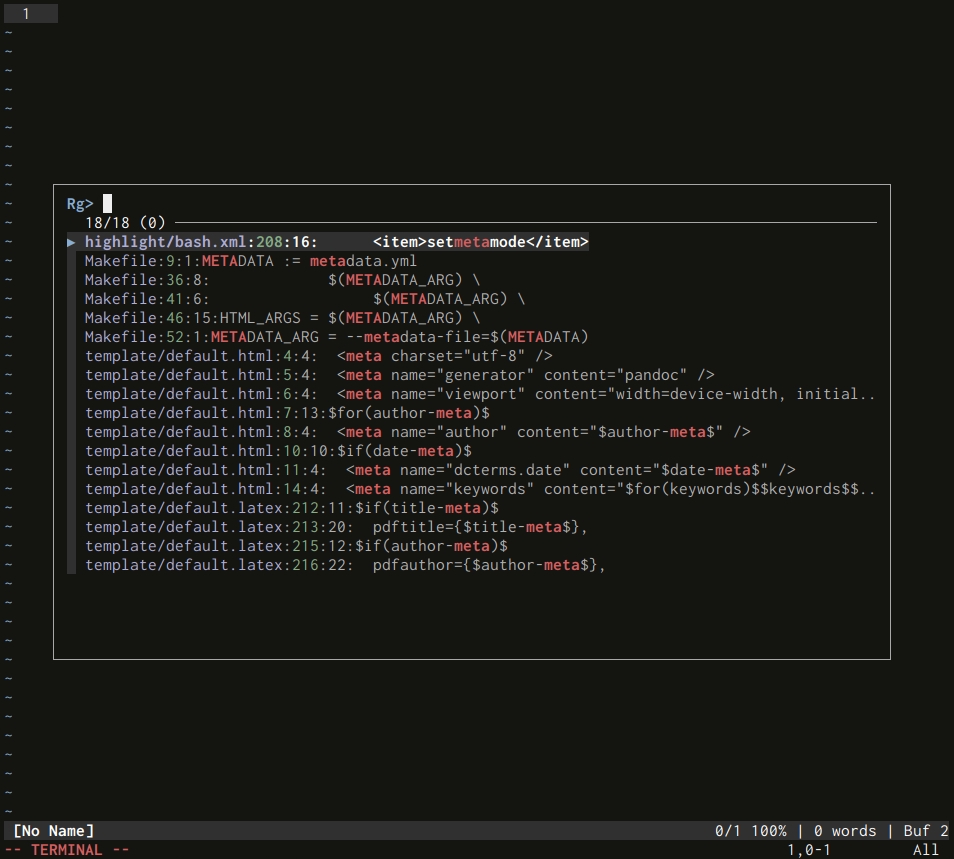
The above user commands are great, but you need to have an idea of the filename you want to edit to use them effectively. What if you want to search into your files’ content directly? Vanilla Vim already offers many functionalities to do so natively, but being able to fuzzy search through all this content is even more effective.
The plugin fzf.vim offers a couple of user commands directly using two external CLIs:
Here they are:
| Ex command | Description |
|---|---|
:Ag [pattern] | Use The Silver Searcher to search the [pattern] through your files’ content. |
:Rg [pattern] | Use ripgrep to search the [pattern] through your files’ content. |
You can also use two handy keystrokes when fzf pops up:
| Keystroke | Description |
|---|---|
ALT-a | Select all files. |
ALT-d | De-select all files. |
Again, you can select multiple entries to edit all the files selected. It’s interesting to note that, in that case, a quickfix list will also be created and filled with these files. Handy if you need to do some operations across all the selected files, for example.
Searching Through Open Buffers
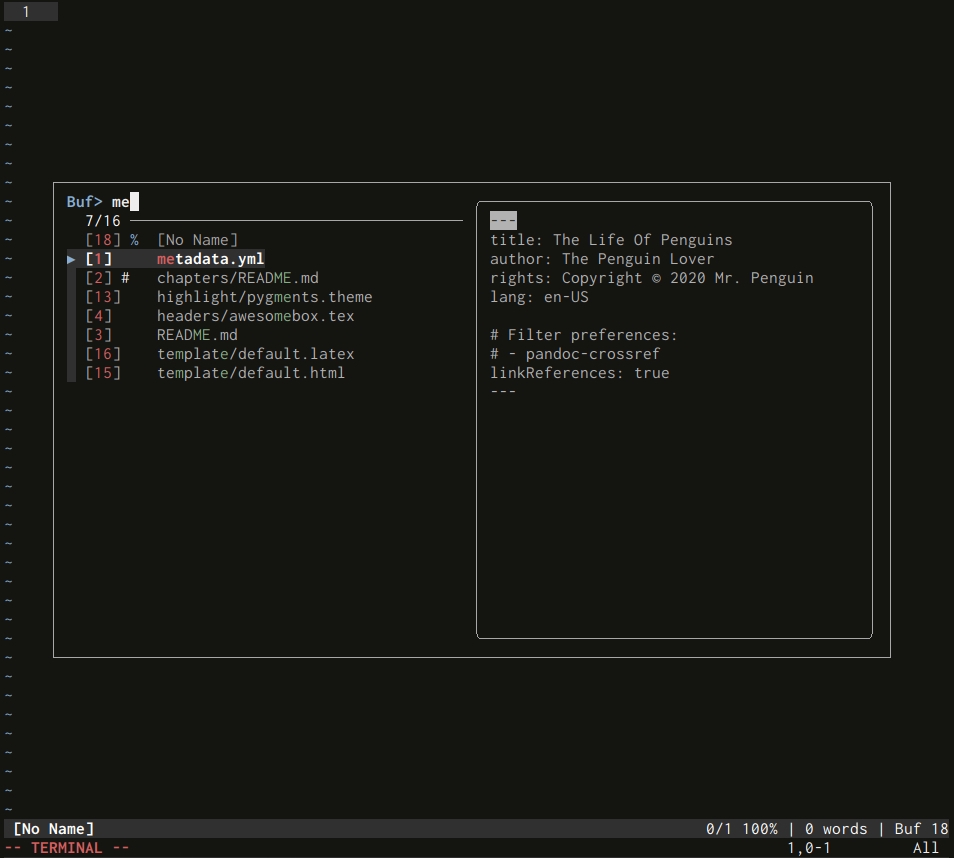
What about searching directly through your open buffers using fzf? It can be a good alternative to the :buffer Ex command, especially if you have an unfathomable amount of buffers open.
Here are the magical commands you always wanted:
| Ex command | Description |
|---|---|
:Buffers | Search through all open buffers. |
:Lines | Search through the content of all open buffers. |
:BLines | Search through the content of the current buffer. |
Again, it’s interesting to note that both :Lines and :BLines will fill a quickfix list if multiple entries are selected.
Searching Through Command and Search Histories
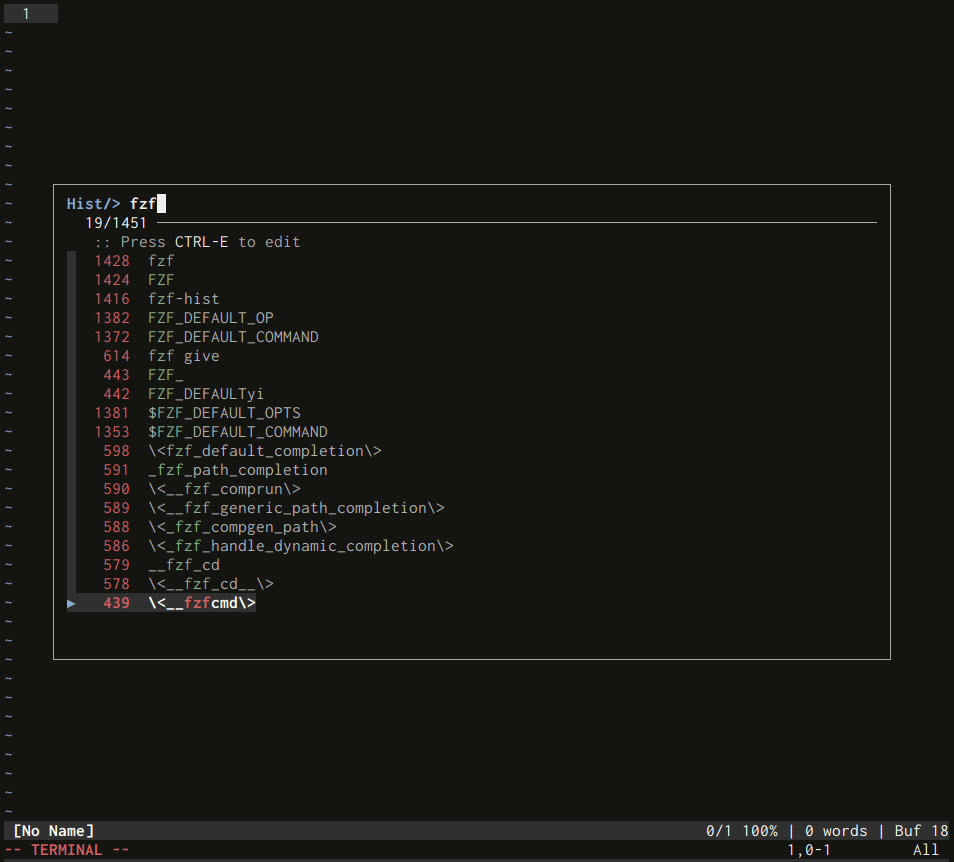
It’s also possible to fuzzy-find your way through different histories, like your Ex command history or even your search history:
| Ex command | Description |
|---|---|
:History: | Search through your Ex command history. |
:History/ | Search through your search history. |
As a reminder, the Ex command history gives all the executed Ex command you’ve run.
Searching Through your Mapping
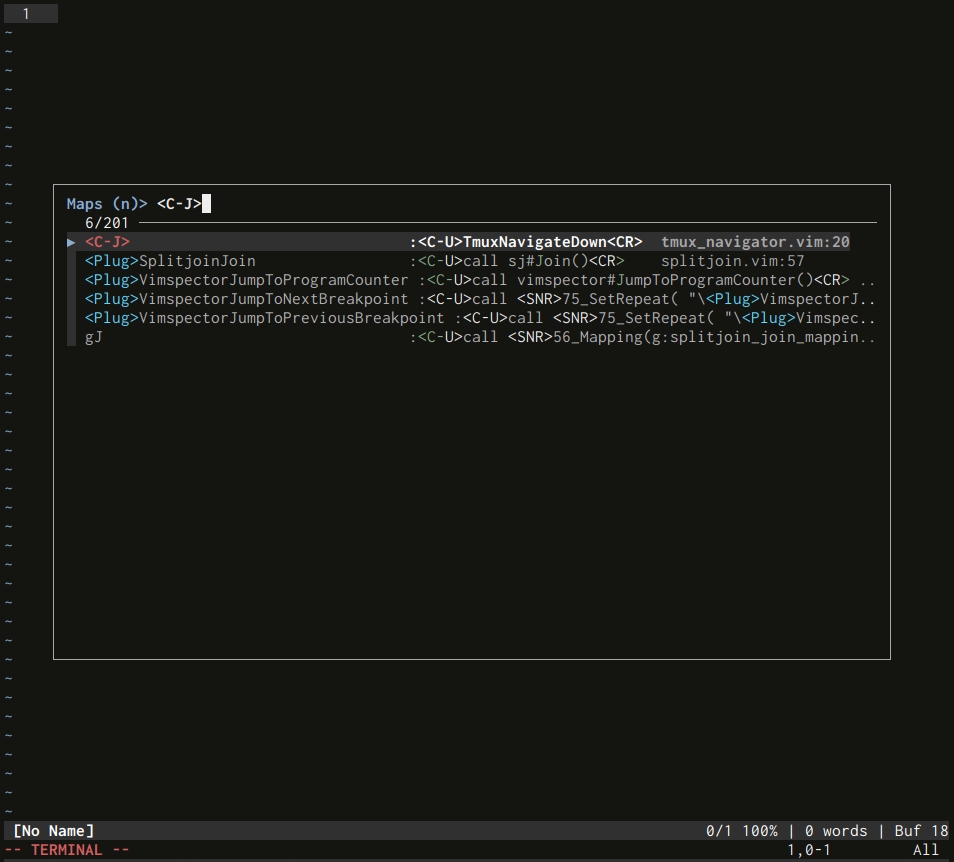
Have you ever wonder how to go through your mapping? By default in Vim, you can use the verbose Ex command :verbose to do so. You can also use fzf:
| Ex command | Description |
|---|---|
:Maps | Search through all NORMAL mode mapping. |
Adding a Prefix to the Default Fzf Ex-Commands
If you don’t like the names of the Ex commands provided by fzf.vim, or if they conflict with your own user commands, you can add a prefix to their names using the global variable g:fzf_vim.command_prefix. For example:
let g:fzf_vim = {}
let g:fzf_vim.command_prefix = 'Fzf'
Then, instead of running :Files to search for a filename for example, you can run :FzfFiles.
You can also directly overwrite these commands with more customized one; we’ll see that in another section below.
Opening fzf Fullscreen
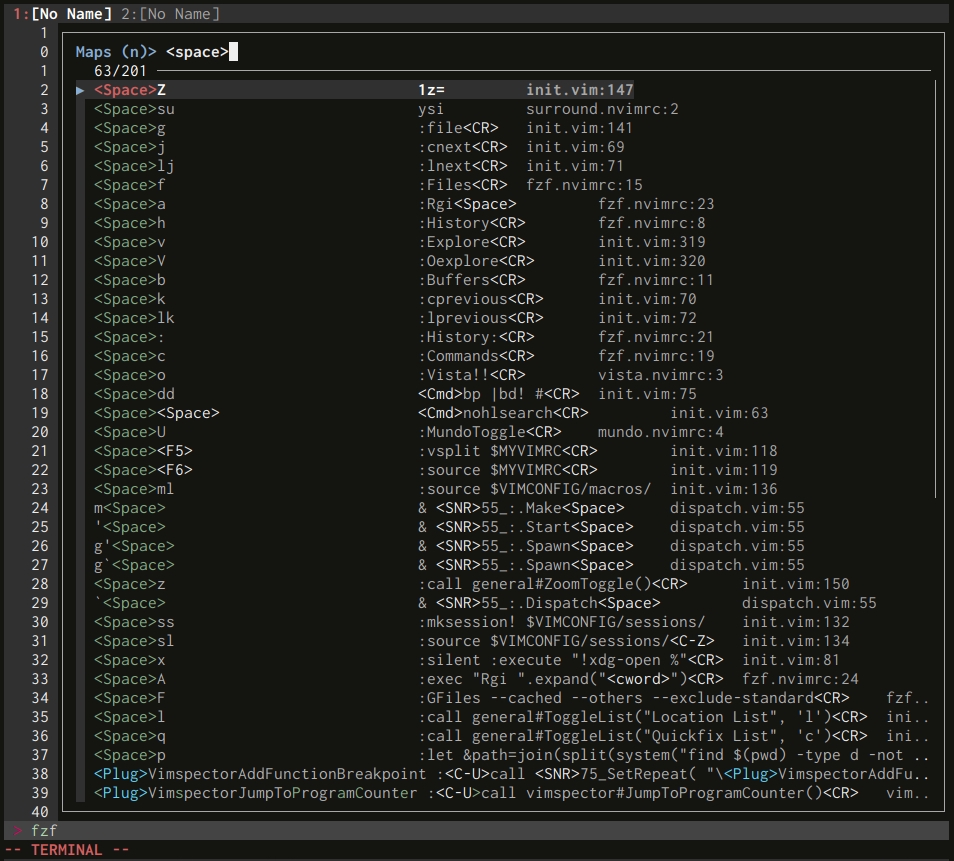
A last detail which can be quite handy: if you want to open fzf fullscreen, you just need to add a bang ! to any Ex command described above. For example:
:Files!
Now, fzf is taking the space it deserves.
Global Variables to Configure Fzf
Now that we saw the most useful user commands to use fzf in Vim, let’s see how you can customize the integration to suit your needs. The easiest way to do so is to use a couple of global variables, directly available in the native fzf plugin.
The plugin fzf.vim add more global variables on top of the ones described below, but in general I find them less useful. As a result, I won’t describe them in this article. If you’re curious, you can grab them in fzf.vim’s README file.
These variables will add different options to the fzf shell command running in the background. To see what this fzf shell command looks like, you can run :echo fzf#wrap(). It’s very handy if you need to debug any unexpected behavior.
History of Fzf Queries
You can keep a history of all the queries you write when fuzzy-finding using fzf, thanks to the global variable g:fzf_history_dir. For example:
let g:fzf_history_dir = '~/.config/local/share/fzf-vim-history'
Each time you hit ENTER after typing a fzf query (to fuzzy search and select what you want), the query itself will be added to the history file, located in the filepath defined by g:fzf_history_dir. To go through the history, you can use the two following keystrokes directly in fzf:
| Keystroke | Description |
|---|---|
CTRL-p | Display the previous entry from the history. |
CTRL-n | Display the next entry from the history. |
Keystrokes for fzf: the Actions
We saw that some Ex commands provided by fzf allow us to use some handy keystrokes to do all sorts of things. We can actually overwrite these keystrokes and add new ones if we want to, using the handy global variable g:fzf_action. Its value is a dictionary with the keystrokes as keys and any Ex command they should run as values.
For example, after running the Ex command :Files (available in fzf.vim), you can open your selected file in a new horizontal split thanks to the keystroke CTRL-x. But what if you want to use CTRL-h instead?
Here’s what you can add to your Vim’s config to do so. Note that g:fzf_action overwrite all the default keystrokes, so you’ll need to define them again (like ctrl-t or ctrl-v for example):
let g:fzf_action = {
  \ 'ctrl-t': 'tab split',
  \ 'ctrl-h': 'split',
  \ 'ctrl-v': 'vsplit' }
Here’s another example I personally use. It shows that you can also use custom functions, not only Ex commands, to create your actions. Here, the function allow me to select multiple files (after running :Files for example) and then open them in a quickfix list with CTRL-x:
" Build a quickfix list when multiple files are selected
function! s:build_quickfix_list(lines)
  call setqflist(map(copy(a:lines), '{ "filename": v:val }'))
  copen
  cc
endfunction

let g:fzf_action = {
  \ 'ctrl-x': function('s:build_quickfix_list'),
  \ 'ctrl-t': 'tab split',
  \ 'ctrl-h': 'split',
  \ 'ctrl-v': 'vsplit' }
Customizing fzf Layout
What if we want to customize the layout of fzf? We can use the global variable g:fzf_layout to do so. For example:
let g:fzf_layout = { 'window': { 'width': 0.7, 'height': 0.6 } }
Here, fzf’s window will take 70% of the width of the screen, and 60% of its height. If you want fzf’s window to be relative to the current window, you can set “relative” to true; for example:
let g:fzf_layout = { 'window': { 'width': 0.7, 'height': 0.6, 'relative': v:true } }
We also saw, in another article, that fzf can use tmux to open a floating window. You can also use it in Vim; for example:
let g:fzf_layout = { 'tmux': '-p70%,60%' }
Configuring fzf Highlighting
Configuring the layout is not enough? You want to change the highlighting in fzf to match your wonderful Vim color theme? You can use yet another global variable, g:fzf_colors, to do so:
let g:fzf_colors =
\ { 'fg':      ['fg', 'Normal'],
  \ 'bg':      ['bg', 'Normal'],
  \ 'hl':      ['fg', 'Search'],
  \ 'fg+':     ['fg', 'CursorLine', 'CursorColumn', 'Normal'],
  \ 'bg+':     ['bg', 'CursorLine', 'CursorColumn'],
  \ 'hl+':     ['fg', 'Visual'],
  \ 'info':    ['fg', 'PreProc'],
  \ 'border':  ['fg', 'StatusLineNC'],
  \ 'prompt':  ['fg', 'Conditional'],
  \ 'pointer': ['fg', 'Exception'],
  \ 'marker':  ['fg', 'Keyword'],
  \ 'spinner': ['fg', 'Label'],
  \ 'header':  ['fg', 'Comment'] }
As you can see, this variable takes a dictionary as value:
- The keys are the elements you want to highlight; they are the same elements you can give to the
--coloroption using fzf in the shell. Here’s a handy list of these elements. - The values are Vim highlight groups.
Let’s take an example from above to understand how it works:
'fg+': ['fg', 'CursorLine', 'CursorColumn', 'Normal'],
Vim will highlight the text of the current line (fg+) with the given highlight group (CursorLine). If this highlight group doesn’t exist, it will try to reach the second one (CursorColumn) and so on, until there are no highlight groups left; in that case, it will use a default color.
The Basic Functions for fzf Integration
We saw, at the beginning of this article, that fzf.vim defines some user commands you can directly use (like :Files or :Rg) to search and edit the files we want. We can also create new user commands, or even overwrite the existing ones.
Using the Run and Wrap Functions
There are two low level functions you can use to define your own user commands: fzf#run and fzf#wrap. Actually, fzf#wrap is not mandatory, but recommended. They are both defined in the native fzf plugin for Vim, so you don’t need fzf.vim to use them.
Both fzf#run and fzf#wrap accept a dictionary as argument. Here are the most useful keys you can use:
| Key | Description | Default |
|---|---|---|
sink | The Ex command executed after selecting some entries. | :edit |
source | The shell command piped to fzf. | FZF_DEFAULT_COMMAND (or fzf’s defaults if not initialized). |
options | The different options given to fzf. | FZF_DEFAULT_OPTS (or fzf’s defaults if not initialized). |
Here’s one of the simplest example we can run:
:call fzf#run(fzf#wrap())
If you run the Ex command above, all the default values will be used:
- The value of the environment variable
FZF_DEFAULT_COMMANDwill be piped to fzf under the hood, to create the list of files given to fzf. - The options defined in the environment variable
FZF_DEFAULT_OPTSwill be given to fzf. - Every entry you’ve selected in fzf will be added as argument to the Ex command
:edit.
If you don’t want to use FZF_DEFAULT_COMMAND (or fzf’s defaults) to create your entries, you can add a source as follows:
:call fzf#run(fzf#wrap({'source': 'fd --hidden .'}))
You need the CLI fd installed on your system for the above command to work properly.
You can also add some options to fzf:
call fzf#run(fzf#wrap({
    \ 'source': 'fd --hidden .',
    \ 'sink': 'edit',
    \ 'options': ['--multi', '--pointer', '→', '--marker', '♡', '--preview', 'cat {}']
    \ }))
This is more or less equivalent to the following shell command:
fd --hidden | fzf --multi --pointer='→' --marker='♡' --preview='cat {}'
From there, it’s not difficult to create your own user command using these functions, and then create a keystroke you could use in NORMAL mode. For example:
command! MyFiles call fzf#run(fzf#wrap({
    \ 'source': 'fd --hidden .',
    \ 'sink': 'edit',
    \ 'options': ['--multi', '--pointer', '→', '--marker', '♡', '--preview', 'cat {}']
    \ }))

nnoremap <leader>a :MyFiles<cr>
You can also add two more arguments to the fzf#wrap function: a first one to specify the filename to use if you want to keep a history of your queries (it won’t have any effect if you don’t define g:fzf_history_dir beforehand), and a last one to specify if the fzf’s window should be fullscreen. For example:
let g:fzf_history_dir = '~/.config/local/share/fzf-vim-history'
command! MyFiles call fzf#run(fzf#wrap('my_files_history', {
    \ 'source': 'fd --hidden .',
    \ 'sink': 'edit',
    \ 'options': ['--multi', '--pointer', '→', '--marker', '♡', '--preview', 'cat {}']
    \ }, 1))
In that case, your history file for your fzf queries will be ~/.config/local/share/fzf-vim-history/my_files_history, and fzf’s window will always be fullscreen.
What if we want to copy the behavior of the default Ex commands defined in fzf.vim, and only display fzf’s window fullscreen if there is a bang added to the command? We can add the -bang option to the Ex command :command to do so:
command! -bang MyFiles call fzf#run(fzf#wrap({
    \ 'source': 'fd --hidden .',
    \ 'sink': 'edit',
    \ 'options': ['--multi', '--pointer', '→', '--marker', '♡', '--preview', 'cat {}']
    \ }, <bang>0))
Now, the Ex command :MyFile! will display fzf’s window fullscreen.
As we already saw, these two functions fzf#run and fzf#wrap are defined in in the native fzf plugin. You could only source this file, create the user commands which are most useful for you, and skip entirely the plugin fzf.vim.
But it’s the theory. In practice, it can be quite challenging to implement :Rg for example. We could think of something like that:
command! -bang -nargs=* Rg call fzf#run(fzf#wrap({
    \ 'source': 'rg --column --line-number --no-heading --glob="!.git/*" '.shellescape(<q-args>),
    \ 'sink': 'edit',
    \ 'options': [
                \ '--multi',
                \ '--pointer', '→',
                \ '--marker', '♡',
                \ '--preview', 'cat {}',
                \ '--preview-window', '50%,border-double,right']
    \ },
    \ <bang>0))
Here’s the result:
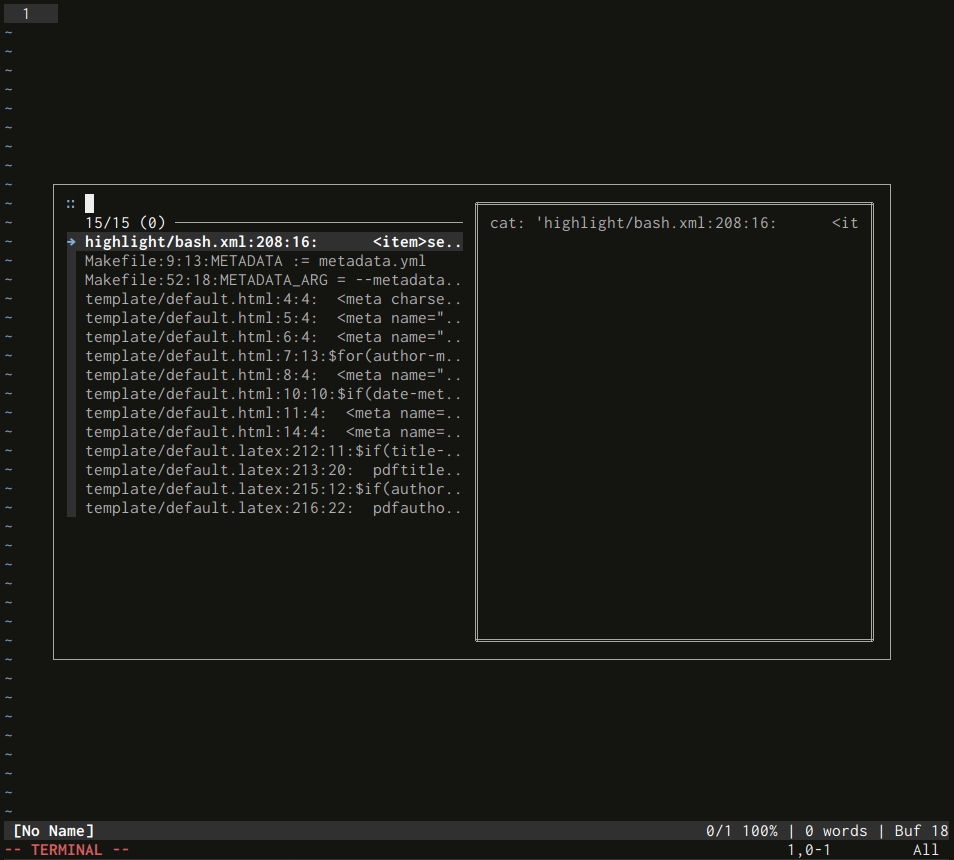
As you can see, it doesn’t really work as expected. Here, fzf tries to add the current entry to the command cat to display the preview, including the filename and the pattern matched by ripgrep. This glob of information doesn’t match any filepath on my filesystem, that’s why the cat command fails, and the preview breaks.
Even worse: if I try to edit a file, this glob of information would be given to :edit, and, as a result, it wouldn’t work either.
It’s better to use the higher level functions offered by fzf.vim to define more complex user commands. These functions use fzf#run and fzf#wrap under the hood.
Using the Functions from fzf.vim
If you look in the GitHub repository of fzf.vim, you’ll find a file defining higher level functions we can use as examples to define our own.
For example, you can see that the command :Rg call the function fzf#vim#grep as follows:
command! -bang -nargs=* Rg call fzf#vim#grep("rg --column --line-number --no-heading --color=always --smart-case -- ".fzf#shellescape(<q-args>), fzf#vim#with_preview(), <bang>0)
This looks a lot like the user command we tried to create in the previous section. But here you don’t have to parse the different entries to isolate the filenames from the pattern matched. The function fzf#vim#grep does that for you.
For example, here’s a user command I use every day, directly overwriting the :Rg Ex command from fzf.vim:
# Overwrite :Rg from fzf.vim
# Hit '?' to toggle the preview
command! -bang -nargs=* Rg call fzf#vim#grep(
  \   'rg
        \ --column
        \ --line-number
        \ --no-heading
        \ --fixed-strings
        \ --ignore-case
        \ --hidden
        \ --follow
        \ --glob "!.git/*"
        \ --color "always" '.shellescape(<q-args>),
  \   fzf#vim#with_preview('right:50%:hidden', '?'),
  \   <bang>0)
If your curious about the implementation of all these higher level functions, you can look at the file vim.vim from the plugin itself.
Alternative plugins
Finally, let’s finish this article with two more plugins specifically targeting Neovim users. I know that many people only want Lua in their config; these plugins, in that case, will be of interest for you:
The second plugin is built on top of the first one, a bit like fzf.vim is built on top of the native fzf plugin.
The Fusion Between Vim and fzf
Vim is a really powerful tool by itself, offering many functionalities without the need of any plugin. But it’s also true that a tool like fzf can improve Vim significantly, offering a more comfortable way to go through your files and lists.
Here’s a summary of the main ideas of this article:
- There are two plugins allowing us to use fzf in Vim: the native fzf plugin directly installed with fzf, and fzf.vim. The second plugin is built on the first one.
- The plugin fzf.vim offers many user commands to search through your filenames, or directly parsing the content of your files.
- You can also search through other lists using fzf: your search or Ex command history, or even your mapping for example.
- Many global variables can be used to easily configure fzf. The most interesting ones are defined in the native fzf plugin.
- You can write your own user functions only using the native fzf plugin for Vim, or, to make the implementation easier, by using higher level functions offered by fzf.vim.
- There are a couple of alternative plugins if you use Neovim, allowing you to configure them in Lua.
If you know any more way to use fzf in Vim, don’t hesitate to let a comment! It could help more people than you think.