
This article is the first part of a series about fzf:
It’s again a sunny day! Desperate, you’re looking through the windows. You’re locked up in the offices of MegaCorpMoneyMaker, the company you’re working for.
While Davina, your colleague developer, explains quietly to one of her colleague the power of the terminal, Dave, another colleague developer, suddenly stands up and interjects:
“What you’re saying is not true! The terminal is an old, clunky tool. It’s difficult to manage files and directories only using a terminal, for example. Using GUIs (Graphical User Interfaces) is often the best idea!”
Davina acknowledges that GUIs might seem more powerful and easier to use than a terminal. But graphical interfaces don’t often have the power to be customized for the specific needs of a developer.
“For example, she continues, the CLI (Command Line Interface) fzf is powerful enough to create ourselves simple but useful TUIs (Terminal User Interface). When you have a specific workflow, CLIs can be combined to support this workflow. Personally, the shell is the keystone of my own development environment.”
She pauses a moment, thinking. Then, she continues:
“I have an idea: let’s try to create a simple file explorer using fzf!”
Many, including you, join the group, decided to help them in this endeavor. Quickly, you decide that the file explorer should have two modes:
- A “file” mode: for searching, previewing, and opening files.
- A “directory” mode: for searching, previewing, and opening directories.
This article is the result of the Dave’s and Davina’s journey at MegaCorpMoneyMaker. You’ll find some small exercises throughout, to build this file explorer step by step. I recommend you to try to solve them; it doesn’t matter if you succeed. You’ll remember more easily if you only try.
In the same spirit, I encourage you to try out the different shell commands described in this article. To follow along, you can download the companion project and run the different commands from there.
We’ll see, in this article:
- The basics of fzf.
- How to enable multi-selection to select more than one entry.
- The special metacharacters we can use for our queries.
- How to limit the fuzzy search to some specific fields for each entry.
- How to customize fzf’s TUI.
- How to preview the different entries.
- How to bind keystrokes or event to some actions.
- How to build our complete file explorer.
- How to fix potential performance issues.
This article also exists as a video you can find on my YouTube channel.
In this article, we’ll only look at fzf as an independent CLI. We won’t discuss the different fzf integrations (with the shell or with Vim, for example). If you want me to write about that, don’t hesitate to contact me by answering one of my newsletter, or by writing a comment down below.
Many examples from this article are inspired from fzf’s manual (man fzf). It’s where you’ll find the most complete guide you’ll ever need; I definitely recommend you to look at it if you need something specific.
Enough rambling! Let’s now dive deep in the labyrinth of fuzzy searching with the fantastic fzf.
The Basics of fzf
A Fuzzy Finder
The CLI fzf is a fuzzy finder, an interactive filter which can be used to easily match plain text entries separated with newlines.
To fuzzy find, you can type a query directly in fzf’s TUI. This query is not a regex pattern, but only plain text trying to match fzf’s input, using an approximate string matching algorithm (also called fuzzy search).
For example, you can try to run the following in your shell:
echo "hello\nbonjour\nbonsoir" | fzf
We give here a string to fzf’s input, creating three entries all separated with a newline \n: hello, bonjour, and bonsoir. The TUI of fzf will then be displayed, allowing us to type our query to fuzzy search the entry we want.
For example, the query “bon” will only match “bonjour” and “bonsoir”; everything else will disappear. You can then select the entry you want with one of the following keystrokes:
| Keystroke | Description |
|---|---|
UP, CTRL-P, or CTRL-K | Select the previous entry. |
DOWN, CTRL-N, or CTRL-J | Select the next entry. |
If you press the ENTER key after making your choice, the selection is simply spit back using the standard output (STDOUT).
It wouldn’t be super useful if we weren’t in the shell; but since we are, we can redirect STDOUT to anything we want. A file, another pipe (to pass the selection as input to another command), a command substitution… you name it.
Default Behavior
If you run fzf without giving it any input, it will run a default command (with the CLI find) to get all the files and subdirectories of the working directory by default. All hidden files will be skipped.
The Default Command
You can overwrite the default command fzf uses under the hood with the environment variable FZF_DEFAULT_COMMAND. For example:
# Use the CLI find to get all files, excluding any filepath
# containing the string "git".
export FZF_DEFAULT_COMMAND='find . -type f ! -path "*git*"'

# Use the CLI fd to respect ignore files (like '.gitignore'),
# display hidden files, and exclude the '.git' directory.
export FZF_DEFAULT_COMMAND='fd . --hidden --exclude ".git"'

# Use the CLI ripgrep to respect ignore files (like '.gitignore'),
# display hidden files, and exclude the '.git' directory.
export FZF_DEFAULT_COMMAND='rg --files --hidden --glob "!.git"'
For the two last examples to work, you need respectively fd and ripgrep installed on your system.
Remember: fzf will use this default command if and only if you don’t give any input.
The Default Options
Like many other CLIs, the behavior of fzf can be significantly altered thanks to its option. If you want to always use the same options without specifying them each time, you can set fzf’s default options with the environment variable FZF_DEFAULT_OPTS. For example:
export FZF_DEFAULT_OPTS='-i --height=50%'
We’ll describe the most interesting options below in the article.
With the proper defaults in place, you can use a command substitution (for example) to edit any file from your filesystem. For instance, to fuzzy search a file (or a directory) and edit it in Vim, you can do:
vim $(fzf)
When I run this command in our companion project, here’s what I get:

You can of course combine command substitutions and pipes if you want to:
vim $(find . -type f | fzf)
Since we feed fzf’s input, FZF_DEFAULT_COMMAND is not used, but FZF_DEFAULT_OPTS is. I’d recommend not to add too many options for specific entries in there (like options which can only work when the entries are filepath, for example). The aim of fzf is to be as general as possible, to fuzzy find any kind of plain text.
Default Query
By default, fzf will start without any query; everything will be matched. You can change that by using the --query option. For example:
vim $(find . -type f | fzf --query "mouseless")
Here’s the result if I run the above in the companion project:

Creating a List of Directory
Let’s begin to create our file explorer. As we said above, it will have two modes: one only displaying files, the other one only displaying directories.
Let’s look at this second mode. We want to create here the list of subdirectories for the working directory, and feed that to fzf’s standard input (STDIN).
We want then to give the selection we make (fzf’s STDOUT) to the command “cd” (as argument), to move to the directory selected.
cd $(find . -type d | fzf)
We use the expression -type with the value d to only display directories. As you might have guessed, if we wanted to only display files, we would have given the value “f”.
We then use a command substitution to give the output of our command to “cd” as argument.
Selecting More Entries with Multi-Selection
By default, we can only select one entry in fzf’s TUI. To select multiple of them, we can run fzf with the following option:
| Option | Description |
|---|---|
--multi or -m | Allow multi-selection. |
We can then use these keystrokes in fzf’s TUI:
| Keystroke | Description |
|---|---|
TAB | Toggle the selection of the current entry and move the pointer up. |
SHIFT+TAB | Toggle the selection of the current entry and move the pointer down. |
Here’s what it looks like with multiple entries selected:

When we then hit ENTER, all selected entries will be spit back to STDOUT, separated with newlines.
Here’s a little exercise: in our companion project, how would you edit all the files in the “headers” directory using Vim?
You need first to launch Vim with the selection you’re making using fzf:
vim $(find -type f | fzf -m)
You can then use the query “headers” to match all the files in the “headers” directory. To select them all, hit SHIFT-TAB to move your pointer up to the top of the list.
Finally, hit the ENTER key to edit all these files in Vim.
There is no keystroke to select all entries (or unselect them) by default. We’ll see how we can configure that in another section below.
Search Syntax
We saw earlier that we can type a query in fzf to reduce the matches and select more easily what we want. I also wrote that these queries are not regex patterns, only plain text queries used in a fuzzy search algorithm.
Yet, fzf’s query system allows us to use a couple of metacharacters similar to most common regex engines, thanks to fzf’s extended search mode. It’s enabled by default; if you don’t want to use it, you can disable it with the option --no-extended (or the equivalent +x).
We’ll try to edit different files from our companion project in this section, always using the following command:
vim $(find . -type f | fzf)
Let’s focus now on these queries.
Beginning and End of Line
Let’s say that we only want to match and edit one of our LaTeX file with the extension “.tex”. To do so, after running our command above, we can use this query:
.tex$
The dollar $ is a metacharacter in that case; it doesn’t match the dollar character, but it has a meaning. For fzf, it means “end of line”, like most regex engines out there.
With our query, we basically want to match filepaths finishing with .tex. Here’s the result:

We can also match the beginning of line with a caret ^. For example, if we want to match filepaths beginning with “./explorer”, we can write the following query:
^./explorer
The OR operator
If we want to match at least one query among many, we can use a bar | between them. For example, if we want to match files with the extensions “.yml”, “.xml”, and “.tex”, we can use the following query:
.xml$ | .yml$ | .tex$
Here’s the result:

Remember that these bars have nothing to do with shell pipes.
The AND operator
We can also try to match multiple queries at once: we just have to separate our queries with a space.
For example, if we want to match all the files with extension “.tex”, and also the filepaths containing “/headers/”, we can write the following query:
.tex$ /headers/
The result:

The NOT operator
What about using a query to exclude some entries? To do so, we can use the bang ! as prefix.
Let’s say that we want to match the files with extensions “.yml”, “.xml”, or “.tex”, but not the files in the “headers” directory. We can write this query:
.yml$ | .xml$ | .tex$ !/headers/
We could translate the above by: “I want to match YAML, XML, or LaTeX files, and not the ones in the ‘headers’ directory”.
The result:

Exact Match
There is a last metacharacter we can use as a prefix to our queries: the single quote ', to get an exact match.
For example, if you type the query ti in fzf, you’ll match any entry including the letter ’t’ and ‘i’, even if they are not following one another. If you add a single quote to the query as prefix ('ti), it will only exactly match a ’t’ followed with an ‘i’.
You can also use the option -e when running fzf to exactly match all your queries, without the need to use the single quote ' for each of them.
Case Sensitive Search
By default, fzf’s search algorithm use “smart-case”: the match will only be case-sensitive if we use one or more uppercase in the query. Otherwise, it will be case-insensitive.
To change this, we can use one of the following options:
| Option | Description |
|---|---|
-i | All queries are case-insensitive. |
+i | All queries are case-sensitive. |
Limiting the Search
Until now, our queries try to match every single character of each entry. What if we only want to match a part of each of these entries?
We can use these options to limit the search scope by entry:
| Option | Description |
|---|---|
--nth | Limit the scope to the nth field of the entry. |
--delimiter | Regex to change the field delimiter (space by default). |
Let’s say that we want to display a number before each entry. To accomplish this miracle, we could use the CLI nl, for number of lines). But we don’t want our queries to match these numbers. Here’s how to do that:
vim $(find . -type f | nl | fzf --nth=2)
The result:

As you can see, there are two fields separated with a space in each entry:
- The number (created by
nl). - The filepath.
We only want to match the filepath with our query, so we give “2” to the option --nth. As a result, if you type the query “2” for example, nothing will be matched.
What if we want to use another delimiter? A comma ,, for example? To do so, we can use the --delimiter option to specify this new separator. For example:
vim $(find . -type f | nl -s ',' | fzf --nth=2 --delimiter=',')
Here’s the result:

Again, querying for “2” (for example) won’t match anything.
Here are some examples of the possible values we can give to the --nth option:
| Example of value | Description |
|---|---|
2 | Only match the 2nd field. |
-1 | Only match the last field. |
-2 | Only match the 2nd to last field. |
3..5 | Only match from the 3rd to the 5th field. |
2.. | Only match from the 2nd to the last field. |
..-3 | Only match from the 1st to the 3rd to last field. |
.. | Match all the fields. |
In the fzf manual (man fzf), this is called the FIELD INDEX EXPRESSION ways of selecting fields. These values can also be used for the placeholder in fzf’s preview; we’ll see that in another section of this article.
Customizing fzf Display
Now that we have a good grasp of fzf’s basics, let’s see how we can customize its display. We can do a lot in that regard; for example, here are a couple of options we can use, to give you an overview:
fzf --multi \
--height=50% \
--margin=5%,2%,2%,5% \
--layout=reverse-list \
--border=double \
--info=inline \
--prompt='$>' \
--pointer='→' \
--marker='♡' \
--header='CTRL-c or ESC to quit' \
--color='dark,fg:magenta'
Here’s the resulting masterpiece of colors and forms:

Let’s look now at each of these options. If you’re not interested to customize fzf’s TUI, you can pass the whole section. You’re the reader, you decide.
Height
You don’t want fzf to take all the height of your terminal? Here are the options you can use to accommodate your sophisticated tastes:
| Option | Description | Default |
|---|---|---|
--height | Height of fzf (rows or percentage). Can be prefixed by ~ to adapt the height depending on the number of entries. | 100% |
--min-height | Minimum height when --height is used with percentage. | 10 |
Here’s how you can use these options:
# Height of 10 rows
fzf --height=10

# Height of 10%
fzf --height=10%

# Height around 10%, depending on the number of entries
fzf --height=~10%

# Height of 30%, minimum height of 8 rows
fzf --height=30% --min-height=8
Margins and Padding
We can also add margin and padding to fzf’s TUI:
| Option | Description | Default |
|---|---|---|
--margin | Comma separated margin (similar to CSS) in absolute number or percentage. | 0 |
--padding | Comma separated padding (similar to CSS) in absolute number or percentage. | 0 |
Here are some examples for adding a margin:
# Margin of 10
fzf --margin=10

# Margin of 10%
fzf --margin=10%

# Margin of 10% on top and bottom, 5% on left and right
fzf --margin=10%,5%

# Margin of 10% on top, 5% on left and right, 8% on bottom
fzf --margin=10%,5%,8%

# Margin of 10% on top, 3% on right, 8% on bottom, 5% on left
fzf --margin=10%,3%,8%,5%
The padding works similarly. Keep in mind that if you don’t have any border, there won’t be any visual difference between adding a margin and adding a padding.
Layout
We can change the general layout with the option --layout (how surprising!). Here are the possible values:
| Value | Prompt’s position | List |
|---|---|---|
default | Bottom | From bottom to top. |
reverse | Top | From top to bottom. |
reverse-list | Bottom | From top to bottom. |
You can also use the option --reverse instead of --layout=reverse. Both are equivalent.
Borders
We can also display borders around fzf’s TUI, thanks to these magical options:
| Option | Description | Default |
|---|---|---|
--border | Display a border. | none |
--border-label | Label to display on the horizontal line of the border. Only some types of borders can have a label. | None |
--border-label-position | Position of the border label. Positive numbers mean number of columns from the left (left-align), negative ones for number of columns from the right (right-align). Can add :bottom to put the label on the bottom line of the border. | 0 (center) |
Here are the value we can use for the option --border:
| Border | Description |
|---|---|
rounded | Rounded corners. |
sharp | Sharp corners. |
bold | Bold lines. |
double | Double lines. |
horizontal | Horizontal lines above and below. |
vertical | Vertical lines on the left and right. |
top | Only one border at the top. |
bottom | Only one border at the bottom. |
left | Only one border on the left. |
right | Only one border on the right. |
none | No border. |
As always, here are a couple of examples:
# Top border and centered label
fzf --border=top --border-label="| My Cool Label |"

# Bold border and label 5 columns from the left
fzf --border=bold --border-label="| My Cool Label |" \
--border-label-pos=5

# Horizontal border and label 5 columns from the right
fzf --border=horizontal --border-label="| My Cool Label |" \
--border-label-pos=-5
The Info Line
If you open fzf, you’ll notice that there is an info line just between the matched entries and the prompt. By default, it displays the number of matched entries and the total number of entries. If you allowed multi-selection like a boss, the count of selected entries will also be displayed in parentheses.
We can display this info line in three different ways, thanks to the value of the option --info. Here are the possible ones:
| Value | Description |
|---|---|
default | The info line is just above the prompt (or below if the layout is reversed). |
inline | The info line is at the same level as the prompt. |
hidden | The info line doesn’t appear at all. |
Do you want some examples?
# Inline the info line with the prompt
fzf --info=inline

# Hide the info line
fzf --info=hidden
Prompt, Pointer, and Multi-Marker
By now I’m sure you’re realizing how much we can customize fzf’s display, to make the most beautiful fuzzy finder in the galaxy. The prompt, pointer (the pointer pointing to the current entry), and multi-markers (the characters marking the selections, if multi-selection is enabled) are no exceptions: we can change them following our craziest artistic inspirations.
Here are the options allowing us to do exactly what I just wrote:
| Option | Description | Default | Character limit |
|---|---|---|---|
--prompt | Change the prompt’s character. | > | None |
--pointer | Change the pointer’s character. | > | 2 |
--marker | Change the multi-markers’ character. | > | 2 |
Here’s an example:
fzf -m --prompt='▶' --pointer='→' --marker='♡'
How lovely!
Adding a Header
What about adding a header to our TUI? This can be useful to give some information to the user, especially when we’ll begin to create keystrokes for fzf; again, we’ll see that later in this article.
The header will appear near the prompt, above or below, depending on the layout. Here are the options you can use to craft the header of your dreams:
| Option | Description |
|---|---|
--header | The header’s content. |
--header-lines | When given a positive number N, the first N lines of input are used as header. |
--header-first | Display the header before the prompt. |
Some inspiration:
# The header is above the prompt
fzf --header="Use CTRL-C to cancel" --header-first --reverse

# Display the first line of output from the command "lsblk" as header.
# It won't be possible to fuzzy search for this line anymore.
lsblk | fzf --header-lines=1
Colors
We have now a good understanding on how to configure fzf’s display. Let’s finish this section beautifully, by looking at the colors we can give to our favorite fuzzy finder.
Colorful Options
Here are the options available to manipulate fzf’s color scheme:
| Option | Description |
|---|---|
--ansi | Allow the processing of ANSI color code. |
--color | Change colors for the different elements of the TUI. |
--no-color | Don’t use any color (black & white). |
Here’s the general pattern to change the color of specific elements:
--color=[BASE_SCHEME][,COLOR_NAME[:ANSI_COLOR][:ANSI_ATTRIBUTES]]...
Keep in mind that the notation you can use for your colors depends on your terminal; more specifically, if it can display 16, 256 colors, or 24-bit colors.
Here are the usual examples:
# Use ANSI color code (bright red)
# The first '^[' is an ESC character - you can spit it with 'CTRL-v ESC'
echo "^[[1;31mHello" | fzf --ansi

# The text of the current entry is red on a "dark" base scheme (ANSI 256 colors).
fzf --color='dark,fg+:red'

# The text of the current entry is red, and the other entries are blue (ANSI 256 colors).
fzf --color='fg+:red,fg:117'

# The text of the current line is red, and the other entries are blue (24 bits colors).
fzf --color='fg+:#ff0000,fg:#0000ff'
You can also use the ANSI color -1 to use the background color of your terminal.
Note that the base scheme is not specified for the two last examples; in that case, it will fallback to the default one. But, you might wonder: what’s this base scheme? I’m happy you ask the question.
Base Scheme
The base scheme gives you some default colors you can then overwrite as you see fit. Here are the ones you can use:
| Scheme | Description |
|---|---|
dark | Dark color scheme for 256-color terminals (default for any 256 color terminal). |
light | Light color scheme for light 256-color terminal. |
16 | Color scheme for 16-color terminal. |
bw | Black and white (equivalent to --no-color). |
For example, if you want to use the light base scheme, you can run:
fzf --color=light
Colors… But for What?
All of that is great, but on what elements can we apply these new colors? Here’s the complete list:
| Element | Description |
|---|---|
fg | Text of the entries (except the current line). |
fg+ | Text of the current line. |
bg | General background (except the current line). |
bg+ | Current’s line background. |
preview-fg | Preview window’s text. |
preview-bg | Preview window’s background. |
hl | Highlighted substrings. |
hl+ | Highlighted substrings for the current line. |
gutter | Gutter on the left (get the value of bg+ if not specified). |
query | Query string. |
disabled | Query string when search is disabled. |
info | Info line. |
separator | Horizontal separator of the info line. |
border | Border around the window (used by --border and --preview). |
label | Border’s label (used by --border-label and --preview-label) |
prompt | Prompt. |
pointer | Pointer. |
marker | Multi-select markers. |
spinner | Loading input indicator. |
header | Header. |
For example, here are the colors I’m using:
fzf --color="bg+:-1,\
fg:gray,\
fg+:white,\
border:black,\
spinner:0,\
hl:yellow,\
header:blue,\
info:green,\
pointer:red,\
marker:blue,\
prompt:gray,\
hl+:red"
As you can see, some elements are related to some preview. What’s that?
Preview in fzf
We can preview the current entry in fzf using a command of our choice. Let’s see how.
Displaying a Preview
Here are all the different options we can use to display a preview in fzf:
| Option | Description |
|---|---|
--preview | Execute the given command for the current line, and display the result in the preview window. The placeholder {} is replaced in the command by the current entry (single-quoted). |
--preview-window | General display of the preview window, including position, border… |
--preview-label | Label to display on the horizontal line of the preview window. Can only be used when a border is present (using the --preview-window option). |
--preview-label-pos | Position of the border’s label on the preview window. Positive numbers represent the number of columns on the left (left-align), negative numbers the number of columns on the right (right-align). 0 (the default) for center. Can add :bottom to put the label on the bottom line of the border. |
These options are not very intuitive; let’s try some examples:
# Display the stats of each directory using the CLI "stat"
# For example, if the current entry is "./home", the preview command will be "stat './home'"
find . -type d | fzf --preview='stat {}'

# Display the preview window with a label centered on top.
find . -type d | fzf --preview='stat {}' \
--preview-label='[ Directory stats ]'

# Display the preview window with a label at the bottom, 3 rows from the left.
find . -type d | fzf --preview='stat {}' \
--preview-label='[ Directory stats ]' \
--preview-label-pos='3:bottom'
Using our companion project, here’s the result for the last example:

If the preview window is too small to display everything, you can still scroll through thanks to these default keystrokes:
| Keystroke | Description |
|---|---|
SHIFT-UP | Scroll the preview one line up. |
SHIFT-DOWN | Scroll the preview one line down. |
Preview’s Placeholder
If the placeholder {} as an integer N between the curly bracket, it will be replaced by the Nth field of the preview’s command output. By default, the field delimiter is space (AWK style).
For example, let’s say that you want to add a number on each line to select them more easily (by just querying the number you want, instead of the directory itself). We already saw how to do that above, using the CLI “nl”:
find . -type d | nl | fzf --preview='stat {}' \
--preview-label='[ Directory stats ]'
If you run the above, you’ll notice that… it doesn’t work! The placeholder will be replaced by the whole entry line, including the prefixed number. If you want to replace the placeholder with only the second field of your entry, you can do:
find . -type d | nl | fzf --preview='stat {2}' \
--preview-label='[ Directory stats ]'
This is similar to the option --nth (see the above section Limiting the Search). You can also use the option --delimiter to use a different delimiter instead of space. For example, if we have a comma , as delimiter:
find . -type d | nl -s ',' | fzf --delimiter=',' --preview='stat {2}' \
--preview-label='[ Directory stats ]'
We can also put some flags between the curly brackets {} of the placeholder for different effects:
| Placeholder | Description |
|---|---|
{+} | Display the preview for all entries selected if you can select more than one (multi-selection enabled). |
{s} | Keep leading and trailing whitespace if you use a specific field instead of the whole entry. |
{q} | Replace the placeholder with the query string. |
{n} | Replace the placeholder by the line number (zero-based). |
You can combine integers (to select different fields) and flags. For example, {+1} or {+n}
find . -type d | fzf \
--preview='echo "File(s) with index(es) {+n} and query {q} \n" && ls -l {-1}' \
--preview-label='[ Directory stats ]'
The result:

Here’s a question which will help us build our file explorer: how to display all directories and the first 50 lines of their file trees in the preview? You can use the CLI “tree” and “head” to do so. It should give you something like this:

find . -type d | fzf --preview='tree -C {} | head -n 50'
The CLI tree normally displays files and directories of the directory given as argument. With the option -C, it only displays directories.
What about modifying the display of the preview window thanks to the --preview-window option?
Layout of the Preview Window
Here’s the general pattern you can use with the option --preview-window to modify its display:
--preview-window=[POSITION][,SIZE[%]][,border-BORDER_OPT][,[no]wrap][,[no]follow][,[no]cycle][,[no]hidden][,+SCROLL[OFFSETS][/DENOM]][,~HEADER_LINES][,default]`
That’s a lot of different values in there! Let’s look at each of them:
| Value | Description | Default |
|---|---|---|
POSITION | Position of the window; left, right, top, or bottom. | right |
SIZE | Height of the window, in rows or percentage. | 50% |
border-BORDER_OPT | Add a border. The placeholder BORDER_OPT can be replaced with one of the borders seen above. | border-rounded |
wrap or nowrap | Wrap the line | nowrap |
follow or nofollow | Automatically scroll to the bottom of the preview window. | nofollow |
cycle or nocycle | Enable cyclic scroll (come back to the beginning when the end is reached). | nocycle |
hidden or nohidden | Hide the preview window. Can only be shown when keybinding the toggle-preview action (see below). | nohidden |
+SCROLL[OFFSETS][/DENOM] | Set an offset for the preview’s window scroll. See the man page for more details. | |
~HEADER_LINES | Always keep the N lines of the preview on top of the preview window. | |
default | Reset any option set before to the default. |
You can use these values in any order. For example:
find . -type d | fzf \
--preview='tree -C {} | head -n 50' \
--preview-window=70%,border-double,top
The result you’ve been waiting for all your life:

Binding Keystrokes or Events to Actions
We can now create a custom file explorer, even with a preview window if we want to. But we’re missing an important feature: being able to bind keystrokes to different commands. It would be nice, for example, to be able to refresh the list of files or directories, in case some were created after opening the file explorer itself.
The Bind Option
Here’s the option we’ll use a lot below:
| Option | Description |
|---|---|
--bind | Comma-separated list of pairs of keybindings (or events) and actions. |
For example, to reload a directory list:
find . -type d | fzf \
--bind='ctrl-r:reload(find -type d)' \
--header='CTRL-r to refresh the list'
To test if it works as expected, you can try to:
- Run the command above.
- Create another directory in another shell.
- Refresh fzf’s entry list with `CTRL-r.
- The directory you’ve created should appear programagically.
As you can see, the pair of keybinding (ctrl-r) and action (reload(find -type d)) is separated by a colon :. We can add more of these pairs; for example, if we want to delete the current directory (with a prompt asking if we really want to to that), we can do the following:
find . -type d | fzf  \
--bind 'ctrl-r:reload(find -type d),del:execute(rm -ri {})' \
--header='CTRL-R to refresh the list | CTRL-P to toggle the preview | DEL to delete the current directory'
The action execute is very useful: it can execute any arbitrary command in a subshell; the placeholder {} is replaced with the value of the current entry. This placeholder works exactly like the preview’s placeholder we’ve discussed above.
It would also be nice to automatically reload the list after deleting a directory, for it not to appear as an entry in fzf. To chain different actions to the same keystroke, we can use the + separator, as follows:
find . -type d | fzf \
--bind='ctrl-r:reload(find -type d)' \
--bind='del:execute(rm -ri {})' \
--bind='del:+reload(find -type d)' \
--header='CTRL-R to refresh the list | CTRL-P to toggle the preview | DEL to delete the current directory'
As you can see, our command to create fzf’s entries (find . -type d) begins to be repeated all over the place. We can create a variable for that and use it everywhere:
FZF_EXPLORER_CMD="find . -type d" && \
eval $FZF_EXPLORER_CMD | fzf
--bind "ctrl-r:reload($FZF_EXPLORER_CMD)" \
--bind 'del:execute(rm -ri {})' \
--bind "del:+reload($FZF_EXPLORER_CMD)" \
--header='CTRL-R to refresh the list | CTRL-P to toggle the preview | DEL to delete the current directory'
Remember FZF_DEFAULT_COMMAND? It’s the default command used by fzf under the hood when we don’t give any input. If you don’t mind overwriting this environment variable the time of a command, you can do the following:
FZF_DEFAULT_COMMAND="find . -type d" fzf \
--preview='tree -C {}' \
--bind='ctrl-r:reload(eval $FZF_DEFAULT_COMMAND)' \
--bind='del:execute(rm -ri {})' \
--bind='del:+reload(eval $FZF_DEFAULT_COMMAND)' \
--header='CTRL-R to refresh the list | CTRL-P to toggle the preview | DEL to delete the current directory'
Using Events and Actions
We’ve bound keystrokes and actions until now, but there are also a couple of events we can use instead of these keystrokes. Here’s the complete list:
| Event | Description |
|---|---|
start | Triggered when fzf starts. |
change | Triggered when the query is changed. |
backward-eof | Triggered when the query is empty but the user still tries to delete characters backward. |
Taking back our example above, we could refresh the list of directory each time we change our query:
FZF_DEFAULT_COMMAND="find . -type d" fzf \
--bind='change:reload(eval $FZF_DEFAULT_COMMAND)' \
--bind='del:execute(rm -ri {})' \
--bind='del:+reload(eval $FZF_DEFAULT_COMMAND)' \
--header='CTRL-R to refresh the list | CTRL-P to toggle the preview | DEL to delete the current directory'
Be careful if you use the start event: fzf creates the list of entries asynchronously, which means that you might not have all entries when the event is triggered. In that case, use the fzf option --sync to build the list synchronously, only displaying the TUI (and triggering the start event) after all entries have been generated. The downside: it might feel slower, because you won’t see the TUI until the list is fully built.
Useful Actions
I won’t list all the possible actions we can bind in this article. You can have the complete list by looking at the fzf’s manual page (man fzf, search for AVAILABLE ACTIONS).
Some actions take arguments, some don’t. Actions with arguments are suffixed below with (...), exactly like in fzf’s manual page:
| Action | Description |
|---|---|
execute(...) | Switch to the alternate screen and execute a command in a sh subshell. Return to fzf when it’s done. Similarly to the --preview option, you can use a placeholder {} for the current entry. |
execute-silent(...) | Execute a command in a sh subshell, in the current screen, without leaving fzf (but block fzf the time the command run). Similarly to --preview, you can use the placeholder {} for the current entry. |
preview(...) | Specify one more preview command, additionally to the one given to the --preview option. |
change-preview(...) | Change the --preview option. |
refresh-preview | Refresh the preview. |
change-preview-window(...) | Change the value of --preview-window. Use the delimiter | to create (and cycle through) different groups of options. |
change-prompt(...) | Change the prompt to the given characters. |
reload(...) | Reload the list of entries with the given command. |
select-all | Select all matches. |
deselect-all | Clear the selection. |
toggle-all | Toggle all matches. |
toggle-sort | Toggle the sorting. |
replace-query | Replace the query with the current selection. |
clear-query | Delete the query. |
unbind(...) | Unbind a binding keystroke. |
rebind(...) | Rebind a keystroke after unbinding it. |
abort | Close fzf. |
You know what’s next: yep, some examples.
# Close fzf with CTRL-D
fzf --bind='ctrl-d:abort'

# Display the preview with CTRL-P
fzf --preview-window=hidden --bind='ctrl-p:preview(stat {})'

# Change the preview with CTRL-P
fzf --preview='file {}' \
--bind='ctrl-p:change-preview(stat {})'

# Change the position and size of the preview window with CTRL-P
fzf --preview='file {}' \
--bind='ctrl-p:change-preview-window(20%,top|50%,right)'

# Change the prompt with CTRL-P
fzf --preview='file {}' \
--bind='ctrl-p:change-prompt(→ )'

# Delete the file or directory with DEL
fzf --preview='file {}' \
--bind='del:execute(rm -ri {})'

# Reload the list of files
find . -type f | fzf \
--bind='ctrl-r:reload(find . -type f)'

# Bind CTRL-A to select all entries
# Unbind CTRL-A and rebind it with, respectively, CTRL-U and CTRL-R
find . -type f | fzf --multi \
--bind='ctrl-a:select-all' \
--bind='ctrl-u:unbind(ctrl-a)' \
--bind='ctrl-r:rebind(ctrl-a)'
Putting it Together: a File Explorer with fzf
It’s time! We looked at fzf enough to be able to create our file explorer. Here are the requirements:
- It should display files by hitting
CTRL-f, or directories by hittingCTRL-d. - It should display directories by default.
- The user should know what keystrokes she can use.
- The user should be able to select one or multiple files or directories.
- Switching to files or directories should refresh fzf’s list as well as the preview.
- Both files and directories should be open using the default text editor when hitting
ENTER. - Everything can be selected with
CTRL-a. - Everything can be de-selected with
CTRL-x. - The preview window can be hidden with
CTRL-p - The user can delete selected files or directories with
DEL. There should be a prompt to confirm the choice.
Concerning the TUI:
- The height should be 90%.
- The preview window should be 45% wide, on the right.
- The border should be sharp.
- The border of the preview window should be sharp.
If files are displayed:
- The prompt should be
Files >. - The preview should be the content of the current file.
If directories are displayed:
- The prompt should be
Dirs >. - The preview should be the tree of the current directory.
So, how would you build that? Don’t worry if you don’t succeed: the most important is to try. It will help you remember the solution.
Here’s the result:
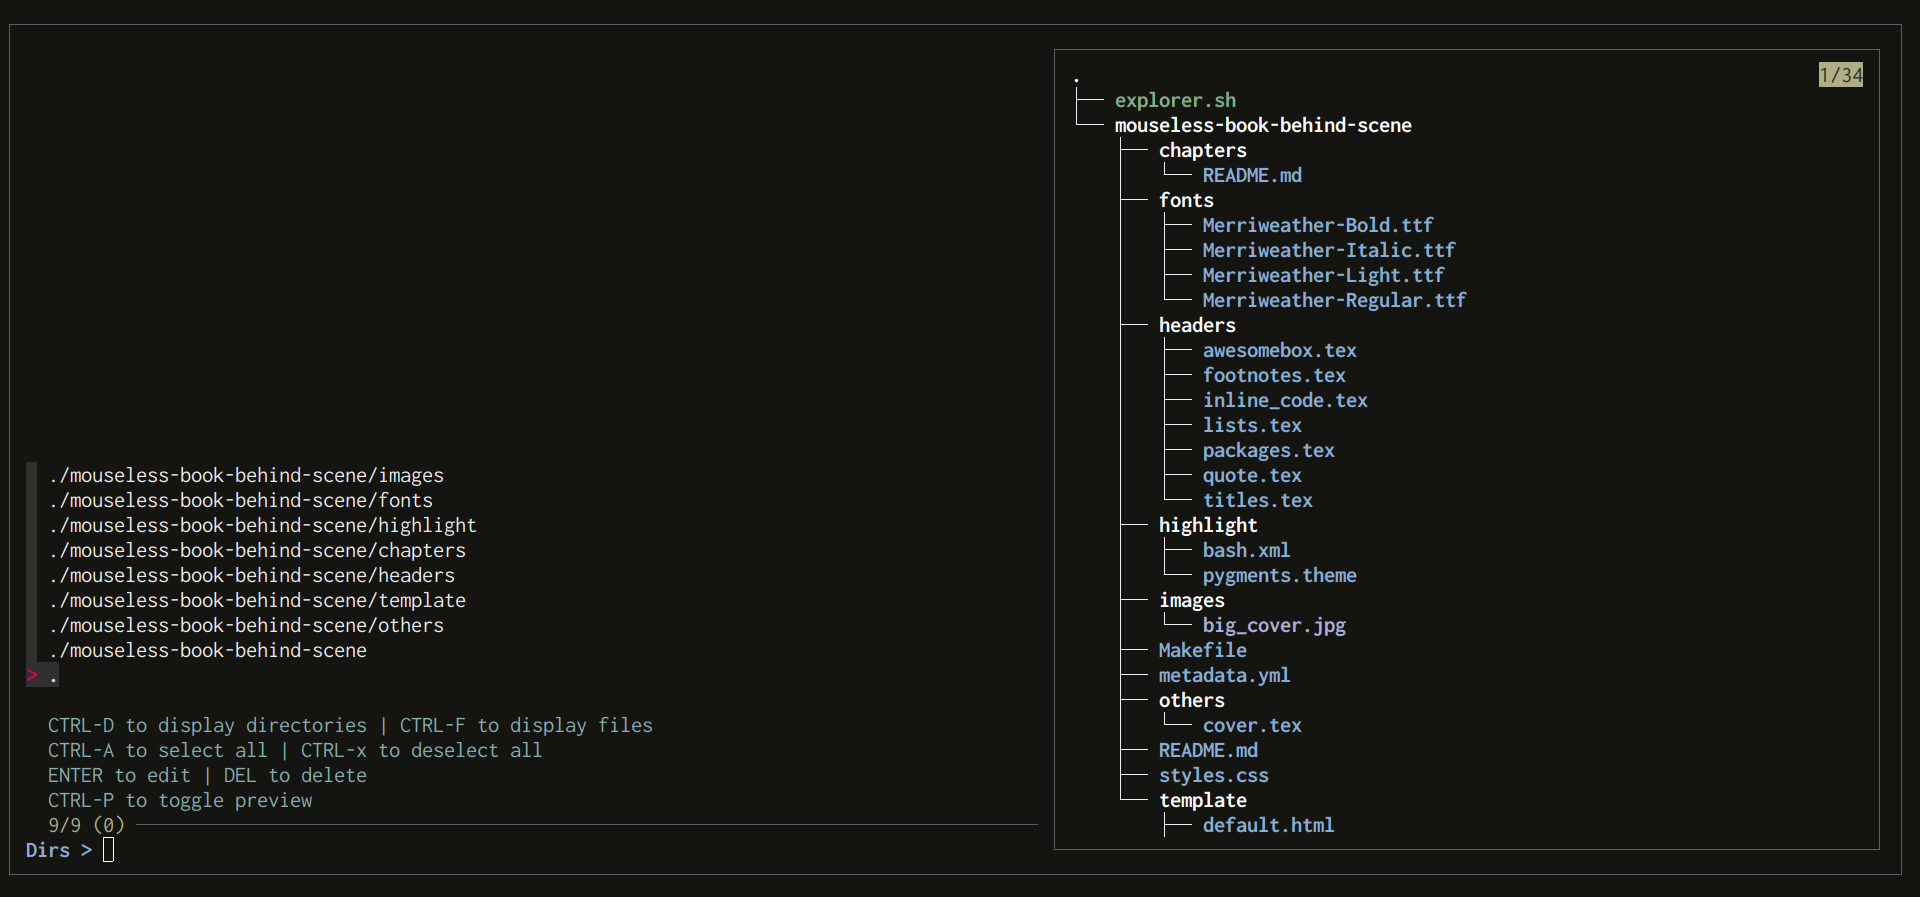
Here’s my solution:
find -type d | fzf --multi --height=80% --border=sharp \
--preview='tree -C {}' --preview-window='45%,border-sharp' \
--prompt='Dirs > ' \
--bind='enter:execute($EDITOR {+})' \
--bind='del:execute(rm -ri {+})' \
--bind='ctrl-p:toggle-preview' \
--bind='ctrl-d:change-prompt(Dirs > )' \
--bind='ctrl-d:+reload(find -type d)' \
--bind='ctrl-d:+change-preview(tree -C {})' \
--bind='ctrl-d:+refresh-preview' \
--bind='ctrl-f:change-prompt(Files > )' \
--bind='ctrl-f:+reload(find -type f)' \
--bind='ctrl-f:+change-preview(cat {})' \
--bind='ctrl-f:+refresh-preview' \
--bind='ctrl-a:select-all' \
--bind='ctrl-x:deselect-all' \
--header '
CTRL-D to display directories | CTRL-F to display files
CTRL-A to select all | CTRL-x to deselect all
ENTER to edit | DEL to delete
CTRL-P to toggle preview
'
Now, can we improve this explorer by editing the files using the current editor when we display the files only, but moving to the good directory when we display the directories only?
First, we need to know if the current entry is a file or directory, to either change the working directory or edit the file with $EDITOR. Let’s try to add a conditional as argument to “execute”:
--bind='enter:execute(if [ -d {} ]; then cd {}; else $EDITOR {+}; fi)+abort'
But this won’t work. The action execute will run cd in a subshell (doing sh -c under the hood), which won’t change the directory of the current shell.
No choice here: we need to create a bash script to solve our problem.
#!/usr/bin/env bash

# Store the STDOUT of fzf in a variable
selection=$(find -type d | fzf --multi --height=80% --border=sharp \
--preview='tree -C {}' --preview-window='45%,border-sharp' \
--prompt='Dirs > ' \
--bind='del:execute(rm -ri {+})' \
--bind='ctrl-p:toggle-preview' \
--bind='ctrl-d:change-prompt(Dirs > )' \
--bind='ctrl-d:+reload(find -type d)' \
--bind='ctrl-d:+change-preview(tree -C {})' \
--bind='ctrl-d:+refresh-preview' \
--bind='ctrl-f:change-prompt(Files > )' \
--bind='ctrl-f:+reload(find -type f)' \
--bind='ctrl-f:+change-preview(cat {})' \
--bind='ctrl-f:+refresh-preview' \
--bind='ctrl-a:select-all' \
--bind='ctrl-x:deselect-all' \
--header '
CTRL-D to display directories | CTRL-F to display files
CTRL-A to select all | CTRL-x to deselect all
ENTER to edit | DEL to delete
CTRL-P to toggle preview
'
)

# Determine what to do depending on the selection
if [ -d "$selection" ]; then
    cd "$selection" || exit
else
    eval "$EDITOR $selection"
fi
Then, we need to call it in the current shell. For example:
source explorer.sh
Fixing Performance Issues
In general, fuzzy search with fzf is blazlingly fast. That said, you might run into performance issues if you have too many entries for example. Here are some options you shouldn’t use if you want to improve the performances:
| Option | Description |
|---|---|
--ansi | Parse ANSI color codes from the input and makes the initial scanning slower. |
--nth | Limit search scope, but tokenize each entry and make fzf slower. |
--with-nth | Transform the presentation of each line, but make fzf slower. |
If you’re not using any of the above and you still have performance issues, you can also try to change fzf’s search engine. By default, it uses “v2”, but you can switch to “v1” as follows:
fzf --algo=v1
Fuzzy Find Forever
The file explorer we’ve created might not be of the taste of everybody, but that’s the real power of CLIs: you can often customize them for your own needs and preferences.
What did we see in this article?
- fzf is a fuzzy finder, allowing us to match a plain text query against line-separated inputs.
- We can overwrite fzf’s default command and options with environment variables.
- fzf allows multi-selection with the option
-m(or--multi). - Some metacharacters (similar to regex patterns) can be used for queries:
^,$, or|for example. - To limit the search scope, we can specify what part of the entry we want to be searchable, thanks to
--nthand--delimiter. - fzf provides many different options to customize its TUI.
- Creating a preview (the output of a command) is quite easy with the
--previewoption. - We can bound many actions to different keystrokes or events, to create a trully unique experience.
- Some options take more resources than other; better disabling them if you’re runnning into performance issues.
As you can see, fzf is general enough to fit many use cases. It’s simple yet powerful, to help us customize our workflow as much as we can. The links belows have many more examples; you’re now able to understand them, and customize them as you see fit!